Camera (very) Fundamentals
Version 3.1, © 2002, 2006, 2009 by Dale Cotton, all rights reserved.
Lesson Three: Stops, DOF, and Apertures
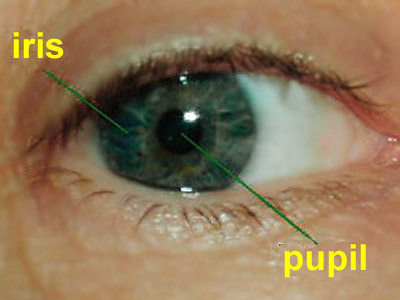
Fig. 8: Look into my eye...
But modern cameras are more sophisticated than just lens and shutter. So let's go back to square one again and re-engineer our Mark II camera once more. To control how much light reaches the film we add a further refinement – one that is based on how the human eye works. The part of your eye that gives it colour is called the iris. In dim light the iris opens to make a bigger pupil opening to let more light into your eye; in brighter light the iris gets bigger to make a smaller pupil opening (see your iris in action using a mirror and flashlight).
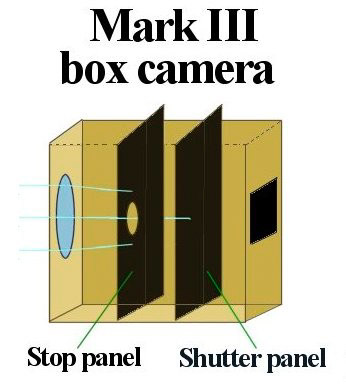
Fig. 9: The Mark III box camera with stop panel and shutter panel
We can do the same thing with our camera. We'll put a second slot in the box to receive a second panel, but the new panel will have a hole drilled in the centre. With the shutter pulled out of the way, light from the lens will still have to shine through this hole to reach the film. We'll call this a stop panel for now, since it will stop some portion of the light from reaching the film. If we make the hole in the stop panel to be the same size as the diameter of the lens (or even bigger) then all the light from the lens will reach the film. We'll call this a 1-stop panel. Now we'll take a second stop panel and drill a hole that only allows half the light from the lens to pass. We'll call this a ½-stop panel; it stops half the light. Clearly, we could make 1/3-stop and 1/4-stop panels, etc.
To operate the Mark III camera we
- Put it in front of our subject with the shutter panel in place
- Decide which stop panel we want to use
- Put that panel into the stop panel slot
- Pull out the shutter for a short period of time to expose the film.
Great ... but what has this added complication done for us? First, let's say that the light is very bright and we're having trouble removing then re-inserting the shutter quickly enough not to over-expose the film. If we have the ½-stop panel in place when we remove the shutter, we can leave the shutter out for twice the length of time before we have to re-insert it. However, as we experiment with our various stop panels we find out that something very interesting has happened to our pictures.
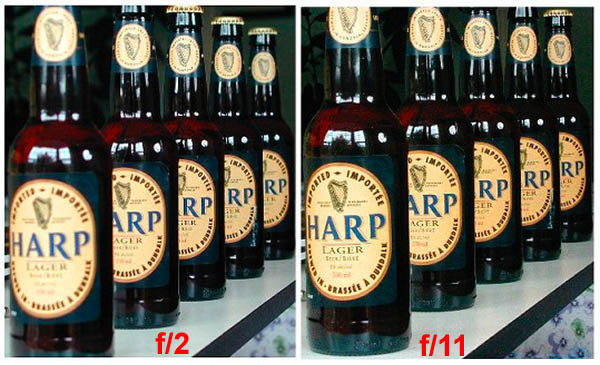
Fig. 10: DOF blur at two different apertures (focus point is on centre bottle in both pictures)
Let's say that the picture we want to take is a scene with a fence about 10 feet in front of the camera, then a cow just a few feet behind the fence, then a barn in the background about 50 feet away. With the 1-stop shutter in the camera perhaps the fence is sharply in focus, the cow slightly out of focus, and the barn totally blurry. With a 1/8 stop shutter in the camera fence, cow, and barn are all in reasonably sharp focus. So we can control how much of the depth of a picture will be in focus by using different stop panels. This is called controlling the depth of field (DOF). Similarly, in Fig. 10 we see that the first and last bottles in the left-hand shot are both blurry, but in the right-hand shot both are much closer to being in focus.
Interesting fact: Many people are near-sighted. If you are one of us, check this out for yourself. Outside in sunlight so bright you have to squint, your pupil (lens aperture) is at its smallest. Consequently, your depth of field is so great you may almost be able to see sharply without your glasses on. At night indoors with only a 40 or 60 watt bulb to light the room your pupils will be open most of the way. Your DOF will be much smaller, so you will find a greater need for your glasses. The eye is a (motion picture) camera with a brain attached to it instead of film.
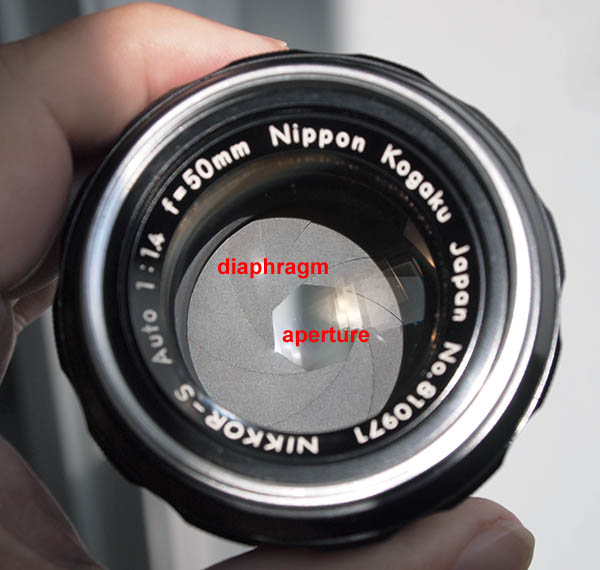
Fig. 11: 7-blade lens diaphragm with aperture set to f/4
Your camera's lens, being the marvel of modern technology that it is, has a variable-stop diaphragm (mechanical iris) inside it. You control how big the opening will be by means of the f/stop setting on the camera body. This opening is called the lens aperture, which corresponds to the pupil of your eye.
Going back to the Mark III, the first stop panel let in all the light from the lens, the second stop panel let in 1/2 the light, etc. Unfortunately, the terminology that has arisen over time is not as simple as 1-stop, 1/2 stop, etc. – even though it refers to exactly the same thing. Instead, what's used is actually a bit of arithmetic and is called f/stop notation. The standard sequence of f/stops is:
f/1 - f/1.4 - f/2 - f/2.8 - f/4 - f/5.6 - f/8 - f/11 - f/16 - f/22 - f/32 - f/64
The "f" part is whatever the focal length is for a given lens. The number after the f – the number that f is divided by – is the diameter of the aperture opening. The fractional numbers, like f/1.4 and f/5.6 are due to the fact that we're dealing with the diameters of circles. (Not to frighten anyone, but each number is a rounded-off multiple of the square root of 2 or 1.41414...) These diameter numbers were chosen to achieve the same sequence of 1/2, 1/4, 1/8, etc. the amount of light we already know we want to work with. So f/1 lets in all light, f/1.4 lets in 1/2 the light, f/2 lets in 1/4 the light, etc.
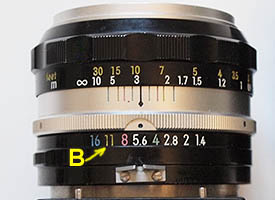
Fig. 2 detail: lens top view with f/stop scale (labelled B)
Looking at the lens portion of Fig. 2, we see the same 50mm lens shown in Fig. 11, but from the top. In Fig. 2 we can see that this lens offers aperture choices (labelled B) from f/1.4 to f/16. (Pop quiz: What fraction of of light does f/16 pass through? Hint: it's not 1/16th.)
Boring fact: The lens in Fig. 10 has the markings 1:1.4 f=50mm on the front. Nearly all lens have similar numbers. 1:1.4 says that the ratio between the focal length and the widest aperture the diaphragm allows is 1 to 1.4. This is simply another way of saying that the widest aperture of this lens is f/1.4. The f=50mm says that the focal length of this lens is 50mm.
Digital: Apertures and f/stops function identically in both digital and film cameras.
Your turn: Many but not all digital cameras have a setting labelled A on the mode dial for aperture priority. This means that you manually set which aperture (f/stop) you want to use, and the camera controls the shutter based on the light meter reading. This is probably the mode that the majority of outdoor photographers use most often. It gives you control of depth of field with a minimum of hassle.
If your camera has Aperture priority, switch to that then experiment taking pictures at different apertures. Find or set up some sort of row of identical objects as in Fig. 10, then observe the DOF changes at different apertures. You may need to vary the length of the row from front to back and the distance of the camera from the first object.