DOF Fundamentals
Page 1. Version 1.2, © 2004, 2006 by Dale Cotton, all rights reserved.
The material in this tutorial applies equally to digital and film photography.
Most photographers learn about depth-of-field, or DOF, pretty much by rote. But this is a subject for which one picture is worth more than the proverbial thousand words. In Fig. 1 I've presented a very simple scenario that we'll use throughout this discussion:
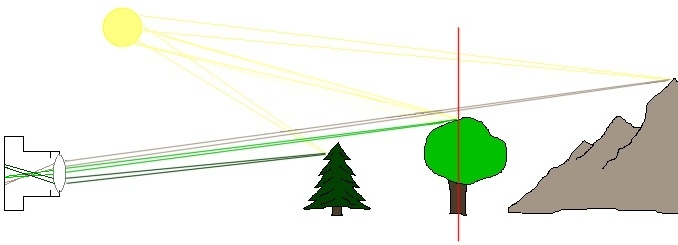
Fig. 1: Plane of focus passes through central tree
This illustration shows a camera pointed at a scene. The camera's lens has been focused on the middle object, the deciduous tree. At the distance from the camera marked by the red line is a plane that is parallel to the plane of the camera's film or sensor (the back of the camera in this illustration).
Anything on this plane of focus, a 2-dimensional slice through the 3-dimensional scene, will be precisely in focus. Anything in front of this plane – even by an inch – will be out of focus. Anything behind this plane – even by an inch – will be out of focus on the film or sensor. And the further anything is from this plane of focus the more out of focus it will be.
To understand DOF we have to think in terms of light "rays" coming from a light source. These rays are nothing more than the straight-line paths of light "particles", or photons. In Fig. 1 we follow the paths of six photons coming from the sun then reflecting off objects in the scene. More precisely, we're looking at two photons striking a single point on the mountain then bouncing back toward the camera, two more photons striking a single point on the deciduous tree then bouncing back toward the camera, and two more photons striking a single point on the conifer then bouncing back toward the camera.
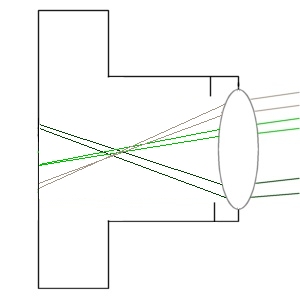
Fig. 2: Close-up of camera, wide aperture
In Fig. 2 we look more closely at what happens inside the camera. The front and back surfaces of the lens have been ground to the shape of shallow sections of a sphere. This causes our six photons to refract, or bend, in such a way that each pair of photons coming from a single point in the outside scene will converge at a single point inside the camera. (Note, however, that a real camera would have a much more complex set of convex and concave lens elements rather than the single convex lens employed in these illustrations.)
The two photon paths shown in light green that come from the deciduous tree converge exactly on the film/sensor plane. The two photon paths from the mountain converge before the film/sensor plane. And the two photon paths from the conifer converge past the film/sensor plane.
Let's consider the point on the mountain. In fact, there will be a very large number of photons arriving from that single point in the scene and entering the camera through various points in the front surface of the lens. But, again, because of the curvature of the lens, all these photons will converge at a single point inside the camera. Unfortunately however, this point is in front of the film/sensor plane – because the mountain is further from the camera than the plane of focus (red line).
These photons continue to travel until they reach the film/sensor plane, but by that time their paths have begun to separate again. We see in Fig. 3 that the result of the spread of all such photons from the point on the mountain, as they strike the film/sensor plane, is a small circle, aptly called the circle of confusion, or COC:
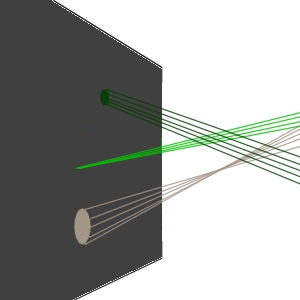
Fig. 3. Circle of confusion on film/sensor plane
We also see more closely that the photons from the conifer also cause a circle of confusion, although for the opposite reason – they have yet to converge. Only the photons from the point on the plane of focus through the deciduous tree exactly converge on the film/sensor plane, leaving only a single point of exposure.