Dale's Digital Photography FAQs
Version 1.5, ©2004 – 2012 by Dale Cotton, all rights reserved.
Composition
Image capture
- How many megapixels do I need to print a picture of such-and-such size?
- Film vs. Digital: how many megapixels do I need to equal film?
- How can I get my entire picture in focus?
- Is the DOF of a digicam the same as a film camera?
- Which digicam should I buy?
- Which setting: sRGB or Adobe RGB?
Image editing and colour management
- I'm having trouble calibrating my monitor with Adobe Gamma
- My prints don't match what I see on my monitor
- JPEG, TIFF, PSD – which file format should I store my images in?
- What scanner should I buy?
- What bit depth should I scan at?
- What resolution should I scan at?
Printing
- What DPI setting should I print my image at? Or: PPI vs DPI
- Which printer should I buy?
- Help! I'm getting a colour cast in my prints!
- Is there some reason to use matte over glossy paper or vice-versa?
- I occassionally have a flake come off the coating of a matte print, leaving an unsightly white spot behind.
Q. Why don't my pictures look as good as the subject did?
Many times I take a picture of a scene or subject that looked absolutely wonderful in person; but when I get the prints back from the mini-lab or when I load the image files off my flash card I am very disappointed.
A. First off, mini-lab prints are mass-produced. When you take a special picture it requires special attention in the darkroom, whether digital darkroom or traditional. For example, the difference between a blah print and a great print can often be the removal of a subtle colour cast or the addition of a bit of contrast.
If you are having problems with the actual composition (framing) of the shot, here is a wonderful resource:
If that seems too elementary, you may be ready for my Lessons in Composition for the Art Photographer.
Here's my own checklist I run through before clicking the shutter release:
- Colour interest or richness
- Shape & line interest or richness
- Textural interest or richness
- Structural strength/integrity
- Structural energy
- Emotional involvement
Q. I've run out of subject matter
I love photography as a hobby and used to be able to go out and find any number of things to take pictures of. Now when I go out everything I look at seems like something I've already done.
A. Me too.
The usual advice one gets on a forum is to experiment: if you are bored with landscapes, try street photography; if you are bored with street photography, try portraiture, etc. This will sometimes work; you may discover a new passion; but basically it ignores a prime factor: a good picture is the result of an emotional connection between the subject and the photographer, the emotion usually being love or attachment (although "hate is also great and would suffice."). And there are only so many subject areas one can bond with.
However, photography is only partly about image capture; what happens after the shutter click is just as interesting and just as critical as camera work. If you aren't already involved in digital image editing and printing, new worlds await you. Once you get into post-processing you will come to look at camera work as something you do from time to time to acquire a new crop of raw material to work with.
But if you have been editing and printing and still feel stuck in a rut, consider taking a leave of absence from photography for an extended period of time. After you mature a bit over time as a person, you will find you have a new involvement with the world and/or you will bring new depth to the old subjects. However, the potential downside of putting your camera in the closet for a year or more is that your camera skills may get a bit rusty ("now what's this hyperfocal stuff, again?") Another option is to switch to doing photography for others – take those daily-grind eBay shots, birthday pix, portraits, etc. that everyone keeps asking you to do since you're so handy with a camera.
Q. How many megapixels do I need to print a picture of such-and-such size?
I have a 3 megapixel digital camera. Is this enough to print 8x10s?
or
What would be the minimum and recommended size image (pixels) required to produce an A2 print without pixelation
A. Any simple answer to this you see on the web is simply wrong. The answer is highly dependent on the printer, the viewing distance, the viewer's eyesight, and the image content. See here for more information.
Q. Film vs. Digital: how many megapixels do I need to equal film?
I am interested in how much detail can be seen in ISO 100 film compared with a digital image (in megapixels). Is it equivalent to 6 million pixels or so?
A. First, there are vast differences between the various 100 ISO films in resolving power. For example, most pros think of the word "film" as being synonomous with "slide film" and ignore neg film.
Second, you don't specify a format; I'll assume you are thinking 35mm film.
Third, estimates also vary drastically depending on the quality of the optics used and the competence of the photographer: tripod, shutter release cable, MLU, etc.
Fourth, film "grain" (actually dye clouds in colour film) is much more visible even at 100 ISO than the noise is with most digital cameras.
When you scan the finest-grained 100 ISO colour film with a 4000 ppi 35 mm film scanner, the result is a 16-bit 24 megapixel image file. However, so many of the pixels are devoted to information-less "grain", that the amount of detail captured is roughly equal to about 10 megapixels for colour neg film and perhaps 7 for colour slide film. I've read that there are b&w neg films that do much better than this.
Here is a typical example of what film looks like fresh from the scanner. This is 20% of the full frame of Reala 100 colour neg film scanned at 4000 ppi:
You can see the grain mottling most clearly in untextured areas, such as sky, water, and the wood rail of the bridge.
Q. How can I get my entire picture in focus?
I've tried hyperfocal distance focusing but still find either the foreground or far background is too often out of focus.
A. (Incidentally, this question is usually the concern of the landscape photographer. Portrait, action, etc. photographers more often want to isolate the subject by leaving the rest of the scene out of focus.)
The depth of field (area from near to far that is in focus, usually abbreviated as DOF) varies with lens focal length, f/stop, sensor size, distance to subject, etc.
The general concept is that the smaller the aperture the greater the depth of field. This breaks down at a certain point due to diffraction effects. As a general guide, the smallest useful apertures by film/sensor size are:
- 4x5 film: f/32
- medium format: f/16 or f/22
- 35mm & full frame digital: f/11
- APS-C and 4/3 digital: f/8
- Bridge/compact/p&s: f/2.8
So if you're shooting a deep field outdoor scene with, for example, an APS-C dSLR and f/11 doesn't get everything in focus from that boulder five feet in front of the camera to the mountain on the horizon ten miles away, it won't help to try an even smaller aperture. The gain in greater DOF will be wiped out by the loss to diffraction blur. The long and short of the matter is simply that getting the entire scene in focus may well be impossible to do, at least without the tilt/shift movements of a view camera. The human eye certainly can't do so, so why expect a camera to?
Hyperfocal is based on a formula that assumes a particular value for the CoC (circle of confusion). This value in turn depends on how much enlargement is applied to the film or image file to create a print. We are often trying to enlarge 35mm to 11 x 17" prints (8x) or 6mp to 12 x 18" prints (16x), which far exceeds the standard .03 inch CoC. Yet as you use smaller values for CoC, the longest focal length you can use gets shorter and shorter, eliminating telefocal and infringing on normal.
I find a better approach, when working with a deep scene, is to consider which part(s) of the scene can be soft without harming the shot. For me, that usually means to keep the foreground and mid-ground in focus, then get as much of the background in focus as I can. To do this I focus behind the nearest objects I want to keep in focus and use a small aperture (see next paragraph). If I have a sharp foreground and mid-ground, a slight softness to the background appears natural. On those shots where the important elements are actually in the background, I focus at infinity or somewhat shy of that and try to eliminate foreground elements, since they will be blurred.
Q. Is the DOF of a digicam the same as a film camera?
I have a Sony/Nikon/Canon/Whatever compact digital camera. When I used to shoot film (35mm) I could get much more bokeh (background blur) at f/stops like f/2 and f/4 then I can now.
A. The depth of field (area from near to far that is in focus) varies with lens focal length, f/stop, distance to subject, etc. If you look on the lens face of your compact digital camera you'll see that the focal lengths are very small numbers, like 7mm to 20mm. The 35mm equivalent may be 35mm to 105mm, but the DOF is based on the actual focal length, not on the 35mm equivalent. So digicams have much larger DOF than 35mm.
Technically, there is a complicating factor having to do with the resolution of the imager (thanks to Jonathan Sachs for this info), so the actual DOF may not be as dramatically larger as the focal length would suggest, but the difference is still significant.
Q. Which digicam should I buy?
Aug. 2007: Advanced photographers should see here.
I am new to photography and am looking for my first digital camera and am confused by all the offerings from Canon, Sony, Nikon, etc. in my local camera store.
A. There are five kinds of digital cameras available in most photo stores and reviewed on sites like Digital Camera Resource, Imaging Resource, and Steve's DigiCams:
- Pocket/slim compacts, which usually have no viewfinder
- Regular compacts (also called point & shoots or p&s), which have both an LCD and a tiny optical viewfinder window
- Bridge compacts usually with a long zoom range (such as 10x), an LCD, and an EVF (electronic viewfinder)
- Micro four thirds and similar (such as the Olympus E-P1 and Panasonic GF1), that have a large sensor and interchangeable lenses but no optical viewfinder
- Digital SLRs (dSLR), which look like film SLRs but have an LCD monitor as well as a largish optical viewfinder.
Some of the most important features you want to look for are:
- Zoom range. The numbers are usually expressed in 35mm SLR focal length equivalents (that may be Greek to you, but don't worry). The focal length of 50mm is roughly what your eye sees, while a smaller number like 25mm is considered wide angle, which means the picture will include more area of what you are taking a picture of but everything will be smaller. A larger number like 100mm is considered telephoto, which means the picture will include a smaller area of the scene but will magnify that area to fill the frame. Beginners usually get excited by a big zoom range because they don't realize the trade-offs involved. A veteran photographer thinks of long focal lengths (over 100mm or so) as being a specialized tool mainly for sports and wildlife, and knows that wide angles down to about 24mm equiv. are more useful for general picture taking. Another disadvantage of long focal lengths is the longer the focal length the more it magnifies the slight tremor of hand-holding. Even image stabilization becomes inadequate and a tripod is required for focal lengths above 150 or so.
- Viewfinder. Many people seem to be perfectly happy shooting by holding the camera out at arm's length and looking at the LCD monitor on the back, no matter how glaring the light is on it. LCDs and EVFs give you less than complete detail from the scene, but do have the advantage of showing you the full frame of the picture and giving you some idea whether the exposure is in the right ballpark. Many experienced photographers are not satisfied with anything short of a big, bright optical viewfinder.
- Handling and weight. You want a camera that is comfortable in your hand and which has controls that you can operate by touch. If you have big hands, a very tiny camera may be hard to use, and vice versa. Slim pocket cameras are typically so light that it becomes hard to hold steady. The new trend to image stabilization becomes that much more important in an ultra-light camera.
- Megapixels. Look for something around 4 to 6 mp in a compact camera; 4 mp will easily print at 8x10" and 6 mp can usually do for an 11x14" print. If you know you want even larger prints, you are better off thinking prosumer or dSLR. While the megapixel wars have driven the pixel count of compact cameras up as high as an absurd 14 mp, the trade-off is the amount of image noise, which also increases rapidly at higher ISOs.
- Shutter lag and shot-to-shot speed. If you are mostly going to do tourist shots and portraits and "say cheese" shots, then this is not an issue. But if you want to take pictures of moving subjects, such as young children at play or sports, you need a camera that takes the picture instantaneously once you press the (shutter release) button. And you also need a camera that can take several pictures in succession without timing out. Fortunately, compact cameras have improved greatly in this area, making it no longer as much of an issue as it used to be.
- Image stabilization. This is one new feature that is far more than a gimmick. The vast majority of all photographs are taken handheld (no tripod); image stabilization uses a gyroscope in the camera to compensate for the small tremoring of your hands that you are not aware of but which blurs your pictures in all but the brightest light.
Other than the above, don't sweat all the technical features like exposure modes for your first camera. You will inevitably outgrow it if you get serious about photography, and if you don't very few cameras don't already have enough technical features for light amateur use. I would opt for a very inexpensive regular point & shoot (group 2 above) for a first camera. If you outgrow it, it will still be handy to throw in the bag for vacations, or you can sell it, or pass it on to a family member.
If you need to get a handle on the very basic concepts of photography, such as exposure, shutter speed, apertures, focal lengths, etc. See my Fundamentals of Photography tutorial.
Q. My camera has a menu option for sRGB or Adobe RGB. Which should I use?
A.This setting is only relevant for the JPEG files that your camera produces. If you shoot raw files it has no bearing. But if you do shoot JPEGs leave this at the default sRGB. If you need Adobe RGB, you'll know it. Adobe RGB can have a certain benefit when used in conjunction with expensive inkjet printers but only when certain other very technical components are also in place. In all other circumstances Adobe RGB is simply going to cause you grief.
Q. I'm having trouble calibrating my monitor with Adobe Gamma
I can't afford a spyder and am trying to use the Adobe Gamma utility.
A. Resorting to Adobe Gamma is a fairly extreme measure; however, we're not all rich. Note that a CRT monitor over 3 years old and the vast majority of laptops LCDs are inherently unprofilable. Older and budget-priced LCD monitors are often unprofilable as well. Recent higher-end LCD panels are usually very close to colour-accurate right out of the box. All of which means you may well get as good a picture as possible simply by using the controls to select sRGB or 6500K colour and brightness/contrast to whatever is comfortable. But if you still want to go with the Adobe gamma utility, a step-by-step on how to use it can be found at Photoshop CS Colour Management.
Going through Ian Lyon's tutorial would be useful if your goal is to print your photos to a printer attached to your computer. You not only need to get the overall (grey) gamma correct, but also the red, green, and blue gammas, and also set the colour temp. to 6500.
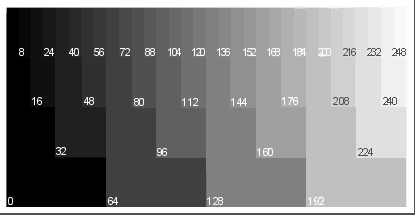
Display the above jpeg at the same time you have the Adobe Gamma utility open in a different part of the screen.) If the mid grey (labelled 128) has a slight colour cast to it (such as being bluish or reddish) then tweak your RGB settings in Adobe Gamma appropriately. Once your mid grey is pure, check the darker and lighter greys. If they are not also pure grey, then your monitor is not perfectly linear. This would be one symptom of an aging or defective monitor, but it's also a matter of degree. You can probably live with a slight non-linearity.
My observation is that people are very sensitive to the slightest cast to the colour grey. Using the mid-grey tuning I've just described I am able to calibrate my monitor more accurately than trying to rely solely on the red, green, and blue targets in Adobe Gamma.
Q. My prints don't match what I see on my monitor
I slave away in Photoshop or other software to get my images just right, then when I print they are either too red or too green (or any other colour) or too dark or too light.
A. This is not the subject of a an FAQ but the subject of a book, such as Real World Color Management by Bruce Fraser, Fred Bunting, and Chris Murphy.
As an emergency/temporary expedient, go to Ian Lyon's Computer Darkroom site and read everything. This will get you started, at least if you are using Photoshop.
For more information on the concepts of colour management, including especially profiling, see the ICC site, and read whatever does not go sailing over your head.
One crucial element is profiles. Both your monitor and your printer needs to be profiled. To profile your monitor you purchase a kit such as ColorVision's ColorPlus or Gretag-MacBeth's Eye-One Display. Consider Adobe Gamma as a temporary stop-gap until you get one of those products. To profile your printer – actually your printer plus a particular paper stock – your best bet is to employ the services of a professional such as:
Cathy Stratton or Eric Hansen.
Q. JPEG, TIFF, PSD – which file format should I should I store my images in?
I have heard that JPEG is a "lossy" format: is it safe to use? Will files saved in any of these formats be accessible in fifty or even ten years given the rate of technological change?
A. First, JPEG. The use of JPEG is a matter of compromise: JPEG allows you to trade away some image quality in order to acquire a savings in file size, and consequently in disk space and/or bandwidth used. This is especially important for files used on the Internet or for e-mail. If no compromise in image quality is acceptable, setting JPEG to it's minimum compression / maximum quality level (for example, level 11 in Photoshop), will have no visible effect on image quality but still buy you a significant savings in file size. However, even then, if you repeatedly open, edit, then save an image, you may eventually experience some degradation.
Hence the need for lossless formats, such as TIFF and PSD. Also, these formats allow you to preserve images in greater than 8-bit colour depth. However, the big question in a person's mind when asking this question is whether a file saved in one of these formats will still be accessible after years or decades of elapsed time. My money is on the answer being "yes".
TIFF may seem more likely to survive because it is seemingly non-proprietary. The problem is that there are dozens of permutations of the TIFF "standard", as new features are added by various vendors. PSD is more like Latin was during the height of the Roman empire (or English is now): a defacto standard enforced by the sheer size of the power behind it (Photoshop). There are fewer variations of PSD and they are more forward and backward compatible than TIFF; but when the empire eventually falls the standards go with it.
So, if for some reason you foresee your files sitting in a vault untouched for a decade or more, it's a toss-up whether TIFF or PSD would be your best bet at this time. Another approach would be to use BMP – this because BMP is such a simple format that it stands a better chance of being able to be reverse engineered so long as binary files are accessible in any way.
However, the idea of preserving files in a vault is much less viable than you might think. On what medium do you record these files? CD-ROM and DVD look permanent, but we already know that they degrade even over a period of five years, let alone decades. And of course just finding a working CD or DVD player that actually connects to whatever passes for a computer in ten or twenty years may be a feat in itself.
Archiving is an active, not a passive process. Forget time capsule. To preserve data you need to monitor its condition at least every few years and regularly transfer it to new media, whether fresh media of the same type or fresh media of some newer type that has replaced the older type.
Q. What scanner should I buy?
I have a life time of film and snapshots I want to preserve...
Or...
I have a wide format printer and want to get the best results out of my film camera.
A. The preservation of family memories does not require a $5000 film scanner. Any flatbed photo scanner, such as the a href="http://www.vistek.ca/store/ProPhotoEpson/234157/epson-v500-perfection-photo-scanner.aspx">Epson V500 Photo Scanner will do a good job scanning prints (300 ppi is apparently all that is needed for that) and will do a tolerable job scanning film, as well.
For uncompromised film scanning look at the Minolta 5400 for 35mm film. I don't have enough experience to recommend a medium format or large format film scanner — they're way out of my budget!
Q. What bit depth should I scan at?
I've read that one should always scan at 48-bits and elsewhere that 24-bits is just as good.
A. The simple answer is always scan at 48-bits, then optionally reduce to 24-bits in your editing software after you've made all major colour and contrast adjustments. However, if you can get very close to your final adjustments by using your scanner's settings, and you need to conserve disk space, then 24-bits is fine.
Q. What resolution should I scan at?
I've read that one should always scan at the highest possible resolution and elsewhere that I should only scan at as high a resolution as I need for my printing.
A. If you have the disk space and if the larger file sizes don't slow your computer down to a crawl, then scan at the highest resolution that matches your shooting style. If you use a tripod and pro quality lenses, you will get more detail out of your film at 4000 ppi or higher and need less sharpening in post-processing. If you shoot handheld and/or use less-that-the-best lenses, you probably will see no improvement by scanning past 3000 ppi.
Q. What DPI setting should I print my image at? Or: PPI vs DPI
I took a picture with my spiffy new 3 megapixel digital camera (or scanned it with my spiffy new scanner) and I have a whiz-bang photo printer that does 1440 dpi. What dpi setting do I use in Photoshop to print?
A. First, let's start with the digital camera. A 3 megapixel camera generates an image file that is usually around 1500 x 2000 pixels. Similarly, consider a scanner scanning a frame of 35mm film that is slightly under 1.5" by 1". If the scanner is set to 1000 ppi, for example, then the resulting image file will be a bit less than 1500 pixels by 1000 pixels.
Now put these numbers on hold for a second, while we look at printers...
Printers use several ink dots on top of each other to create one pixel on the paper. My Epson 2200 has 7 different ink colours, so any given pixel on paper is going to be a combination of ink dots from the nozzles for each of those 7 inks. Every pixel in the image file from my camera or scanner is some given colour, but is unlikely to be the exact colour of one of those 7 inks. So to create that particular colour the printer needs to overlay multiple dots of different inks.
So if I set my printer to 1440 or 2880 or whatever, that number is in dots per inch or DPI. However, my scanner or camera image file in not in ink dots, it is in pixels, and there is no simple way of saying how many ink dots = one pixel or vice versa.
Let's suppose we decide to make an 8" x 10" print from our 3 megapixel camera image file of 1500 x 2000 pixels. We have 1500 pixels to work with going across the narrow dimension, which is 8". If we divide 1500 by 8 we get 187.5 pixels per inch (PPI). If we divide 2000 by 10 we get 200 pixels per inch. We're not allowed to set two different PPI numbers for the same print job, so we will use 200 PPI to keep the file from overrunning the paper.
If you have a choice, then the more pixels per inch you print at the crisper your print is going to look up ... to a certain point. Anything over 300 pixels per inch is often considered to be overkill, although some printers work best at a certain ppi setting, such as 360 ppi. Going the other way, when the ppi value drops below 180 or so, the results begin to look less acceptable than the snapshots you get from your local mini-lab.
See here for more information.
Q. What photo printer should I buy?
Or
I'm on a budget but would like the best printer under $200.
A. There are not a lot of definitive printer reviews on the web. The best site I know of for inkjet reviews is photo-i. Supplement this by reading the threads on dpreview.com printer forum, then maybe ask a few questions.
FWIW, I use the Epson 3800 and bought the Epson C-77 for my son when he needed an inexpensive homework plus photo printer. I don't have any experience with HP or Canon models.
Q. Help! I'm getting a colour cast in my prints!
Could this be the dreaded double profiling?
A. If you have Photoshop 6 or later the first thing you want to do is set it up exactly as explained in Ian Lyon's definitive tutorials at:
http://www.computer-darkroom.com/home.htm
It you go through every step of configuring PS and the driver interface according to Ian's instructions, and you are still experiencing a cast, that narrows the possibilities down considerably.
Some other possibilities are:
- Incorrect monitor profiling
- Incorrect light source for print viewing
- Mismatch between profile and paper stock
- Slight clog in a printer nozzle
- Line noise in your power source (!)
- Reinstall the profiles you are using in case they've gotten corrupted.
Q. Is there some reason to use matte over glossy paper or vice-versa?
Most fine art photographers seem to be printing on matte these days.
A. First: combined with an archival inkset, the better matte papers are rated as having a greater life-expectancy than RC-type photo papers. (See the Wilhelm Imaging Research web site for more details.) If you are using a non-archival inkset, this is a non-issue.
Before digital and inkjet photographs commercial prints from film were almost always made on resin-coated (RC) paper and art photo prints on fibre photo paper. These are frequently stamped with a pattern of fine wrinkles to break up the glare, and the result is variously called lustre, pearl, or semi-gloss finish. Fuji Crystal Archive is an example of such a paper; it and similar papers by Fuji, Kodak, and Ilford were the choice of nearly all photographers who exhibited prints ... until now. Such photographers tend to continue to use photo paper if they've switched to inkjet printing. Examples like landscape photographers Joe Cornish and Joseph Holmes come to mind.
Photo papers still have a larger gamut and more brilliant look than matte-finished papers. Combined with a crisp, properly exposed image that has not been enlarged too greatly, the result is a print that looks so realistic it could almost be mistaken for a window into the portrayed scene. This is both the strength and the weakness of photo paper.
When you start thinking sales, a photo paper print faces a few challenges. First, your average guy-off-the-street is going to be a bit pressed to understand the difference between a poster-sized photo paper print selling for hundreds or thousands of dollars, and a cheap repro of the same or similar print selling for five or ten dollars. Second, the same guy-off-the-street owns a camera of some sort and may tend to think he could have taken the same "shot" if he were to go to the location shown and snapped off a frame. Third, gallery owners are immersed in the world of paintings in which manual skill and imaginative expressivity are more valuable aspects than "mere" realism. All these prejudices can combine to put a photo paper print at a sales disadvantage. Of course photographers have overcome that disadvantage and managed to create a reputation for their name that results in lucrative sales ... yet you will rarely see their prints for sale except in galleries that specialize in photography.
Matte, and especially cotton rag photographic prints are a very recent trend and a direct result of inkjet technology. A matte print, on a quality rag paper with at least a bit of texture, can to that perphaps small degree leverage the mindset that equates painted art with expensive art. To add a further aura of artsiness, the term "giclée" was coined to disguise the fact that the original such prints were done using inkjet printers (see The True Story of Giclée on DP&I).
Update, 2010: over the past few years a new genre of inkjet paper called baryta fibre has superceded both matte and RC photo papers for the majority of art photo printers. This class of paper imitates the fibre papers almost universally used in the wet darkroom. It combines the brilliance of standard RC photo paper with something of the refined/luxurious look and feel of cotton rag matte papers. Early test results indicate that baryta fibre papers with archival pigment inks will last as long as, or very nearly as long as, cotton rag prints.
Q. I occasionally have a flake come off the coating of a matte print, leaving an unsightly white spot behind.
A. You may have tried retouching with ballpoint, crayon, pencil, etc. and found that nothing works, because nothing matches the particular sheen of the surrounding ink.
Instead open the image file for that print; crop a small portion from the image that includes where the flake is; print that on clear film, such as overhead transparency acetate, or simply print to the wrong side of a scrap piece of photo paper (the ink doesn't dry on the back). Now use a toothpick to scrape off a daub of wet ink the same colour as what the flake should be and carefully apply it to the print. Allow to dry for a few seconds. I read this years ago on a printing forum: I wish I could attribute this to the originator but can no longer remember the name.