The Case of the Mistaken Multi-Meter
Page 1 of 1. Version 1.1, ©2007 by Dale Cotton, all rights reserved.
This article targets photographers who regularly work outdoors in existing light and who often need to quickly establish an exposure value, as in working with a moving subject or rapidly changing light.
On camera forums I'm forever reading that "camera X consistently underexposes" or "camera Y occasionally overexposes" or "I need to dial in -1/3 exposure". You'll read this in the loftiest reviews as well as in the lowliest newby post. Sorry to be blunt: but it's all a load of crock. The simple fact is that multi-metering is a perfect example of computer intelligence at its contemporary peak. Or, in normal human parlance, of simple idiocy.
If you're not familiar with the concept behind multi-metering (also variously called evaluative metering, matrix-metering, and pattern-metering), it simply means that the camera takes exposure readings from multiple points across a frame, sends that to the internal computer that controls it, which in turn uses some formula to decide where to place the over-all exposure for the entire frame.
Casing the crime scene
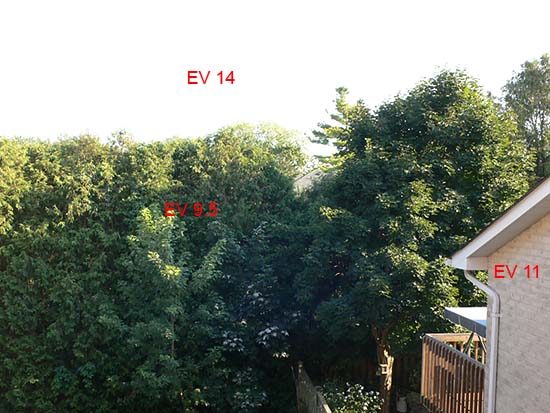
Fig. 1: Av=f/4.0; Tv=80; multi-meter
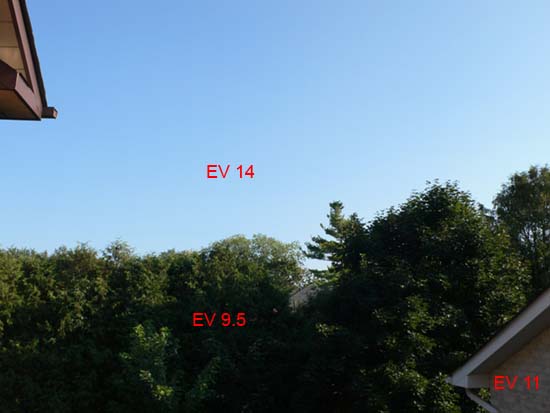
Fig. 2: Av=f/4.0; Tv=500; multi-meter
I've performed this simple experiment with any number of cameras over the years, both film and digital, and always with nearly identical results. All I did to take Fig. 1 and Fig. 2 was to point my camera somewhat higher for Fig. 2 than for Fig. 1. In other words: I increased the amount of sky and decreased the amount of trees. The brightness level (AKA exposure value or EV) of the sky (EV 14) has not changed between the two frames. The exposure value of the trees (roughly EV 9.5) has not changed between the two frames. Since the sky is burnt out in Fig. 1 and the shadow areas of the trees are inked out in Fig. 2, clearly the desirable exposure is somewhere between the two extremes.
To demonstrate this for yourself follow these simple steps:
- Put your camera in aperture priority with metering set to multi/matrix/pattern.
- Find a scene similar to Fig. 1 (substitute buildings, a roof top, or anything else for trees, as needed; and it's irrelevant whether the sky area is above or beside the darker area).
- Shoot.
- Now point your camera up or down without changing anything else, so more or less sky is in the frame.
- Shoot.
If the dynamic range of the scene in Fig. 1 and Fig. 2 had exceeded the exposure latitude of the camera (or film) we might have excused the multi-metering result on the grounds of having asked it to do more than it had been designed to do. But that is not the case. The EV of the sky just above the trees was 14 stops and the EV of the trees below the sky centered around 9.5 stops, for a total DR of 5.5 stops, which is well within the reach of every modern photographic tool except slide film.
Putting on a deer-stalker cap
If you care to dig a little deeper, let's do a bit of (highly) amateur sleuthing. To get started we'll need to start with a premise that is sure to irritate any artificial intelligence pundits who may have read this far. Namely: computers have zero awareness. The computer in my camera that took frames Fig. 1 and Fig. 2 had no understanding that there was a darker area called "trees" and a brighter area called "sky". Instead, it mindlessly follows a rule that the centre of the frame (or, at least, the part of the frame centered around the active focal point) is what we sentient entities call the "subject", and is therefore to be assigned a median exposure value.
Of course, that's just a description of the much simpler centre-weighted metering pattern. Apparently, by reducing the frame to such a simple case (all dark below, all bright above), we've reduced the multi-meter to acting as if it were a centre-weighted meter. In Fig. 1 the centre of the frame happens to fall within the (dark) tree area, so the camera's computer has to conclude that the "subject" has an average EV of 9.5. In Fig. 2, just by pointing the camera up a bit, the centre of the frame now falls within the (brighter) sky area of the frame, so the camera's computer has to conclude that the "subject" has an average EV of 11.
Fingering the culprit
So what to do? The usual approach is to dial in some mystical exposure compensation value, such as -1/3 stop or +2/3 stop, and hope for the best. The difference in exposure between Fig. 1 and Fig. 2 is just shy of 3 stops, so a -1.5 stop exposure compensation would have saved the one frame, while a +1.5 stop would have saved the next. If I'd composed somewhat differently, then yet a different exposure compensation would have been needed.
If circumstances demand that you react instantly or lose the shot, all you can do is gamble that your multi-meter will get it right. Much of the time it will. At the opposite extreme, if you can afford to take as much time as you need, you can take a shot, review it for blinking highlights, etc., dial in some setting adjustment, then re-take as needed (and with a mirrorless or compact camera you can make your adjustments before taking the shot). Similarly, if you're dealing with a relatively stable lighting situation, such as a sports event, you can dial in your exposure before the action starts, then use that when the action starts. It's the muddled middle, when you have a second or three to set up the shot but no more, in which skill and experience come into play.
If you're doing an interior shot with a daylit window in the scene, your past experience tells you there's no way you're going to find an exposure value that will work for both exterior and interior. You've found some relatively graceful compromise that works for you, and you go with that once again. The trick to multi-metering is to practice so much that you instantly recognize every lighting scenario it will fail in and to have already figured out your best work-around.
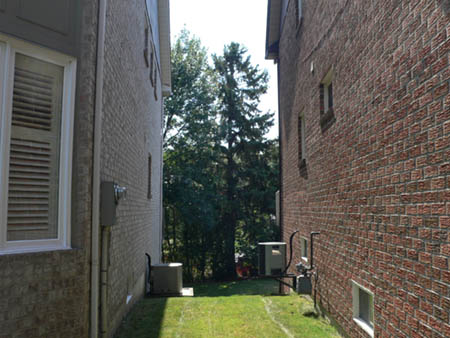
Fig. 3: A practice shoot uncovers this nasty scenario
The drill is quite simple. All you need is a digital camera with a) some sort of in-camera feedback for blown highlights, whether they blink or show up on the right edge of the histogram; and b) some way of identifying inked shadows, usually a histogram bunched on the left. Go about with that camera in your neighbourhood, in your home, in your yard, at a park, and at various times of day. Do this as often as possible. Take a picture with the default multi-meter exposure, then review it to see if the exposure was off either to left or to right. If it was, then form a theory as to what fooled the meter in that situation and test it in similar situations, then figure out your compensation strategy to deal with it. What you don't want to do is get caught up trying to compose keepers. For this exercise your only goal is to learn where your meter will fail.
Another option might well be to use centre-weighted metering pattern as your default for action work. At least with C/W you always know what the camera's about and can reliably compensate accordingly, via AE Lock. As an added benefit, the compensation reflexes you develop with any one camera will seemlessly transfer to any other camera.
And for situations in which you have those precious few seconds to set up each shot, you might want to learn to use your spot metering pattern, as described here.