Raw to the Rescue
Why you should shoot RAW+JPEG
Page 1 of 1. Version 1.1, ©2013 by Dale Cotton, all rights reserved.
A recent forum post asked why anyone would ever use the RAW+JPEG file output option on cameras with raw capability. If you normally only shoot JPEG, then two words: safety net. If you take a critical picture but blow the exposure, there is a simple procedure in most commercial raw converters that can fix, or at least greatly improve, problem exposures. Other problems can be fixed too, such as correcting for the wrong white balance, improving noise reduction at high ISOs, and straightening a skewed picture.
Space waste. Raw files are large. You may well be concerned about wasting storage space on your memory card or hard drive. If you're on a trip, don't have an endless supply of memory cards, and can't download files from your card to a hard drive before filling your card(s), then RAW+JPEG is unfortunately not the way to go. Note: Another situation in which you would avoid raw+JPEG is shooting continuous sequences as in sports or wildlife (thanks to forum member Ultimitsu). Otherwise, do shoot RAW+JPEG, but once you transfer the files to your computer, simply delete all raw files for all pictures that don't need rescuing. Best of both worlds.
I'm going to use Lightroom and an over-exposed picture to illustrate how to use the raw safety file you were wise enough to capture. If you don't have Lightroom, simply bookmark this page, wait until the first time you need to perform a rescue, then download and install the 30-day free trial version from adobe.com. Or, you should be able to figure out the equivalent procedure in the raw conversion program of your choice, such as Photoshop Elements (very similar), Aperture, Capture One, or DxO. But bear in mind that the one that came free with your camera likely does not have this capability.
1. Opening the raw file of the problem picture
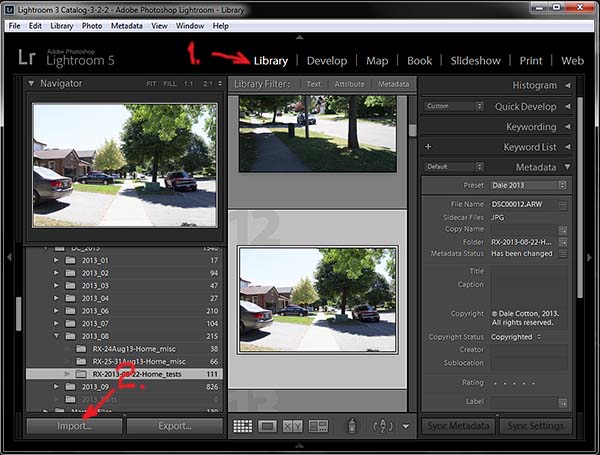
Fig. 1
When you open Lightroom, it will look something like Fig. 1. If the module named Library isn't highlighted, click on it. Then click on the Import... button, bottom left. This opens the Import dialogue shown in Fig. 2.
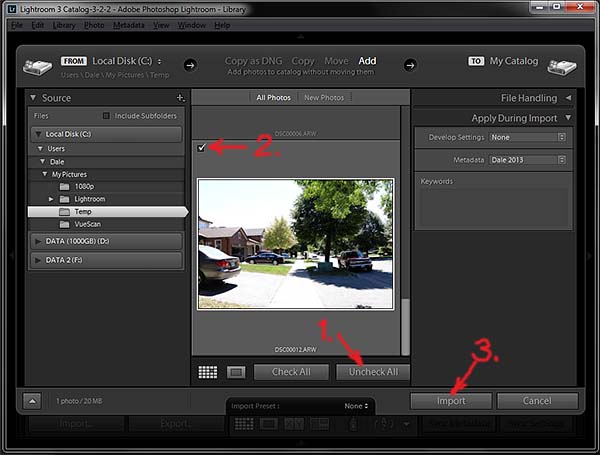
Fig. 2
Navigate on the left to the location of the raw file you want to repair. Assuming there is more than one raw file there and you only need to work on one of them, click on Uncheck all, then click on the appropriate check mark to select just the one file in the middle panel. Finally, click the Import button, bottom right. This returns you to the Library module.
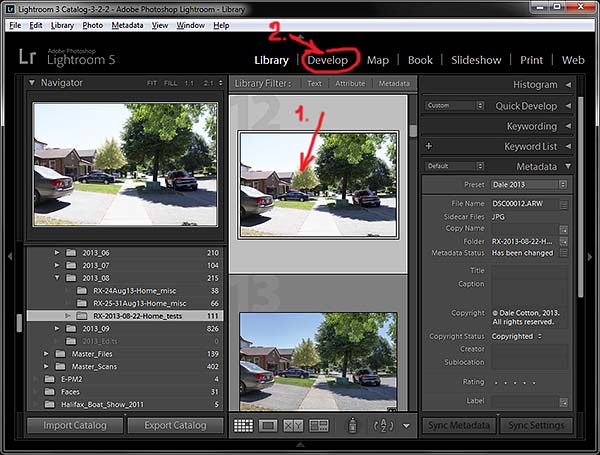
Fig. 3
Back in the Library module, click on the thumbnail of the raw file you want to repair, then click on Develop as shown. This takes you to the Develop module.
Fixing the problem
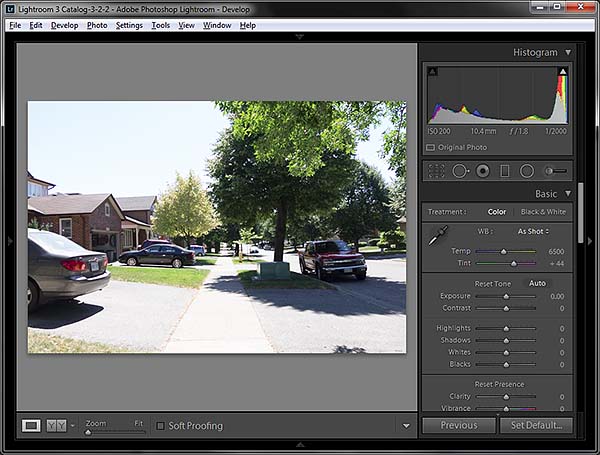
Fig. 4
Here we see the problem picture. This was drastically over-exposed. The entire picture is too bright and the sky is nearly pure white instead of blue. (In the camera's JPEG the sky is pure, stark white.)
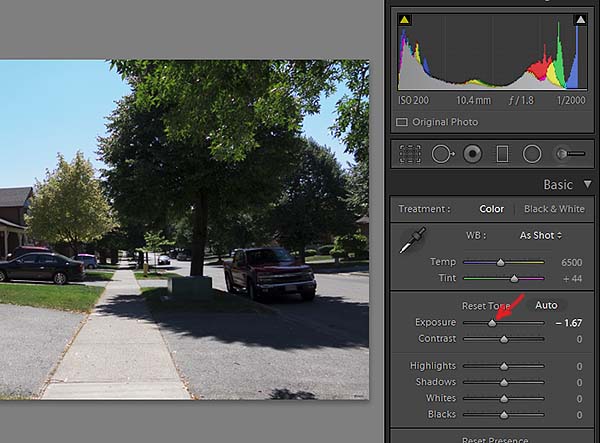
Fig. 5
Drag the Exposure slider to the left until the sky looks as blue as you like and the rest of the scene doesn't look over-bright. There is no exact science to this. Purely a matter of taste.
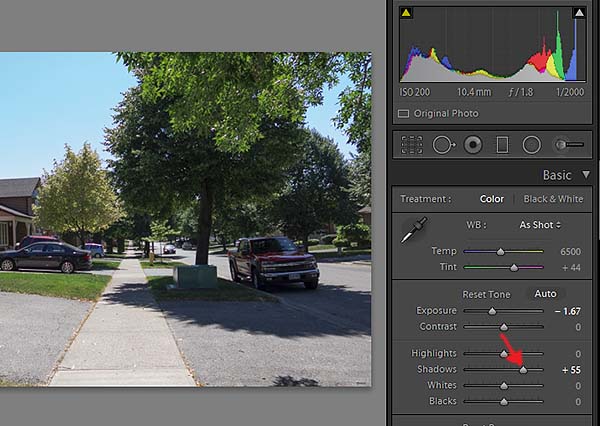
Fig. 6
To finish up with this picture I also dragged the Shadows slider to the right until the areas of the scene that are in shadow are the way I want them. Again: purely a matter of taste.
To rescue a picture that was under-exposed, so that everything is too dark, simply follow the above steps but move the Exposure slider to the right rather than to the left.
Finish by saving as a JPEG
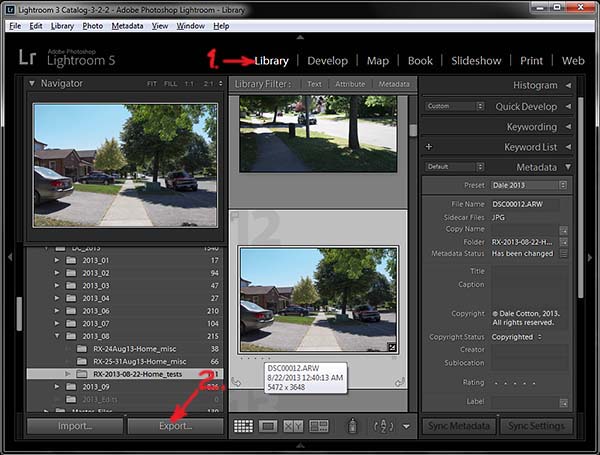
Fig. 7
When you're done making corrections, click on the Library module tab, top right. Back in the Library module, click on the Export... button, bottom left.
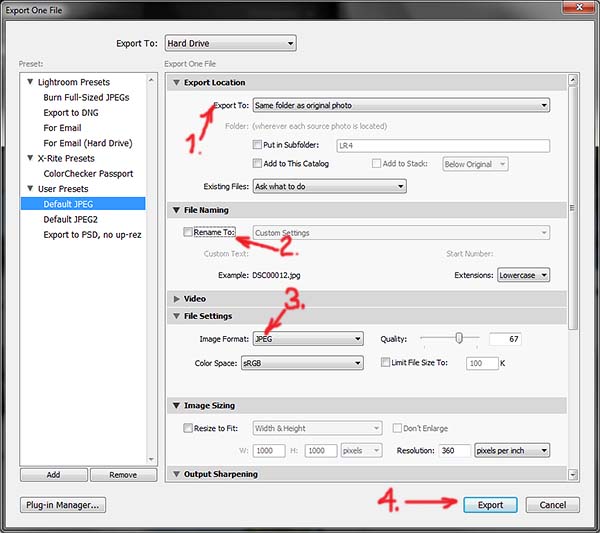
Fig. 8
In the Export dialogue box, locate the drive and folder you want to save your corrected version to. Rename the output file to taste. Select JPEG as your output file type and optionally adjust the Quality slider. Moving the Quality slider left makes a smaller output file, right makes a larger, but higher quality one. Finally, click the Export button. (Note: your Export dialogue will not look exactly like mine in Fig. 8, due to many changes I've made to it over time.)
That's it. You now have a corrected JPEG version of the problem picture on your hard drive or wherever you chose to save it.
WARNING: Raw conversion can be addictive. Be careful not to play with any other sliders lest you discover many other ways to improve your pictures. Especially avoid Contrast, Clarity, Vibrance, and Saturation in Lightroom or their equivalents in other raw converters. If you accidentally do make such changes, in Lightroom proceed immediately to the History section on the left in the Develop module, then click on the history state from before the accidental change or changes, as shown in Fig. 9.
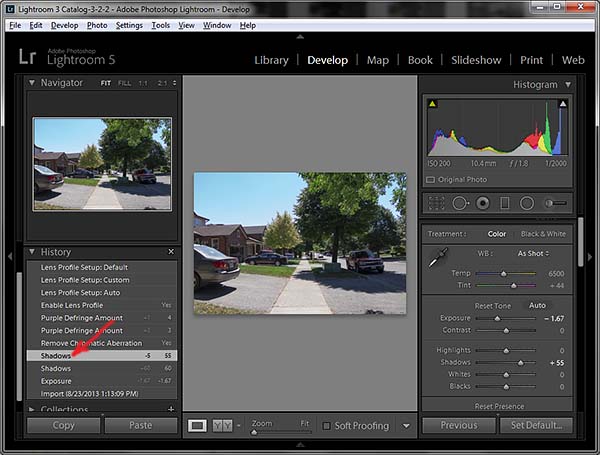
Fig. 9