Pentax K20D tips & tricks for RAW shooters
Page 1 of 1. Version 1.3, © 2008, 2009 by Dale Cotton, all rights reserved.
Update 2009: my guess is that most of this tutorial applies to the K-7 as well as the K20D. Feedback appreciated.
Most of this document will be of little use to you unless you:
- Use a Pentax K20D (or K-7?) dSLR (although some points will apply to other models)
- Shoot mostly RAW
- Shoot mostly existing light
- Shoot ETTR (expose-to-the-right)
The K20D like all modern dSLRs is chock full of features. So much so that one almost needs a pre-flight checklist as long as that of an airline pilot before exposing a shot. The following are five tips from the most trivial to fairly weighty that I've managed to snare from this jungle of complexity. They happen to work well for my own approach to my own type of photography, which is a mix of landscape and snapshot/street. Hopefully, at least one will prove useful to you too.
SR Do's and Don'ts
One might be tempted to think of shake reduction (SR) as a license to throw away one's tripod. The problem is that the K20D's 14.6 megapixels is even more merciless at revealing flaws like camera shake than previous models. For landscape work I've found I don't want to go above 400 ISO (800 ISO in a pinch) or below 1/125th sec. shutter. So when I foresee working in dimmer light and know I need maximum res., I'll take a tripod ... and try to remember to turn the SR switch to off. ;)
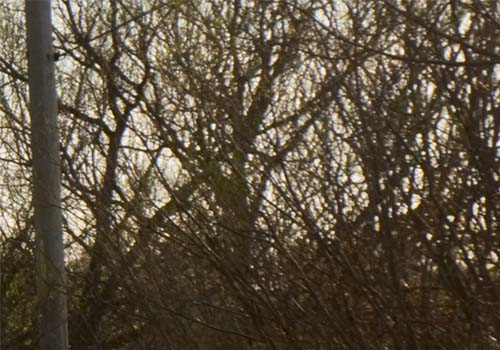
Fig. 1: SR blur (detail from right edge of larger frame)
I used a Panasonic point-and-shoot for years before buying a K20D. All Panasonics have built-in image stabilization and it kicks in instantaneously, so you never have to wait for it to lock in. This results in a habit I'm having a terrible time kicking – assuming SR is locked-in simply because I have the SR switch set to On. Instead, SR in the K20 takes maybe half a second to lock in, so one has to watch the bottom right of the finder to check for the shaking hand icon to appear before pressing the shutter release. Because I don't have the habit of waiting for the shaking hand icon, I have more than a few frames with what appears to be left-right motion blur on the right side of the frame, as seen in Fig. 1.
There's probably a very good engineering reason why my $500 Panasonic has instantaneous image stab. but my $1200 Pentax does not. I just don't happen to know what it is. ;)
Divide and conquer
By default your camera is set up to both focus and meter off the same part of the frame. This is fine for beginners, but it doesn't take long to bump one's head against the limitations of this approach. As we'll see below, there are critical advantages to metering off what is least likely to be the focal point of the frame. What I suggest you try is to set the AF button on the back of your camera to control auto focus, instead of the traditional half-press of the shutter release. Ever half-press a little too hard and take a picture you didn't intend to? That's another reason to make this change. But the main reason is that you can choose your focus point, press the AF button to activate AF, then move on to re-framing and exposure with complete confidence that your focus will stay the way you want it for as long as you want it there, including from one shot to the next.
Procedure
- Go into the Custom Settings menu...
- Choose 6. AE-L with AF locked. This should be Off.
- Choose 7. Link AF Point to AE. This should be Off.
- Choose 13. AF Button Function. This should be 1, Enable AF.
- Choose 14. AF by Press Halfway. This should be Off.
- To use your camera now, simply press the AF button on the back with your right thumb, and hold it until the hexagonal AF-achieved icon appears in the finder, whenever you're pointing at the area you want to be in focus.
Thanks to Bryan Middleton for pointing out that Continuous AF still works with this combination of settings. Simply hold down the AF button.
Take control of ISO
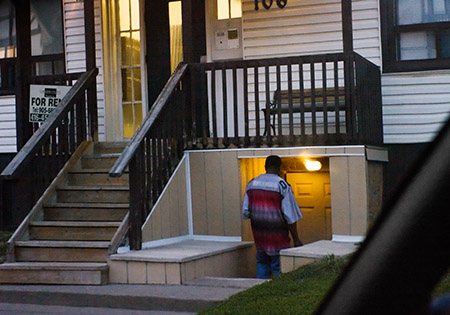
Fig. 2. 6400 ISO
The K20D simply reeks of design brilliance in the ISO department. It may be that studio shooters leave the ISO at one setting then leave it there for life, but those of us who do field work seem to be constantly juggling between ISO, shutter speed, and DOF/aperture. By default the K20 doesn't display the current ISO in the finder or on the top LCD, but it can be checked by pressing the Info button to the left of the monitor. By default, you need to go into the Fn menu to change ISOs, unless you're satisfied with the admittedly very nice auto ISO feature. But most of us want to be in the driver's seat and for this we need to customize. Here's what to do:
Procedure
- Go into the Custom Settings menu, choose 31. Display Sensitivity, and set it to On. This puts ISO in the finder and on the top LCD.
- Still in the Custom Settings menu, choose 21, 22, and 23, then select whichever of the options that puts ISO on the thumb wheel you prefer. For me the rear thumb wheel makes sense for ISO, since it's right under the ISO number displayed on the top LCD.
Once you start using this configuration, you'll find that the frame count is missing, having been replaced by the ISO number. No panic. The frame count shows for a second after every exposure, but more importantly can be retrieved by simply pressing the OK button on the back at any time. Put the Pentax engineering team on your Valentine's Day card mailing list for this one, folks.
Byan Middleton writes: If a wheel is set to directly control ISO, I have found that the green button puts you into Auto ISO. This is slightly different from the operation described on p. 79 of the user manual. To cancel Auto ISO, use the wheel to manually select a ISO speed. If you do not have Memory set to retain the ISO setting, I believe the default for Auto is 100-400 and ISO itself is reset to 100.
Roll your own ETTR meter
Note: ETTR stands for expose to the right. If there's any dSLR owner in the world who hasn't yet read the tutorial on Luminous Landscape based on the work of Thomas Knoll, inventor of both Photoshop and Adobe Camera Raw, you need to go here.
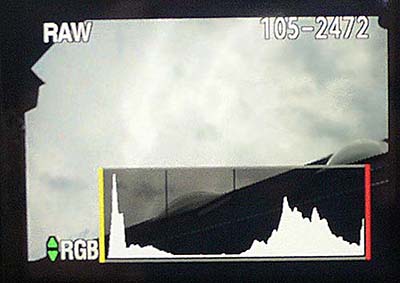
Fig. 3: Monitor histogram
Every digital camera comes equipped with a very small but very powerful computer system tucked away inside. Things like autofocus and evaluative metering come to us courtesy of the programming built into that computer. At present no automobile manufacturer markets a vehicle that drives itself. This is not surprising considering the lawsuits that would result if such a system were to fail in fatal fashion. Camera makers are under no such constraint and so cheerfully pass the risk of failure on to their customers.
So far as I know every digital camera ever made has had evaluative metering built in, either as the sole metering mode or as one of the metering options. The idea is that the camera will take over metering by looking at the brightness levels in multiple parts of the frame then apply clever logic to find the optimal exposure. This is a great idea. Even crusty veterans can benefit from having the camera handle exposure in action situations in which there's simply no time to think about anything but framing. The problem is that none of them actually work, as I've written about here.
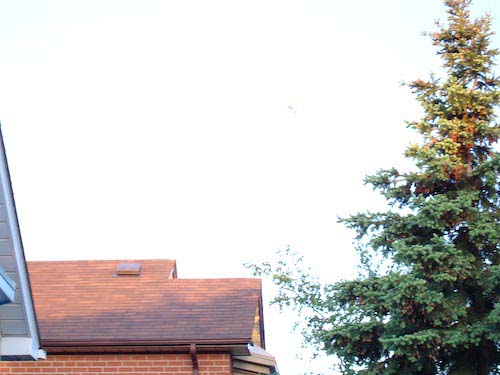
Fig. 4. This sky was not white: scene blown by evaluative metering
What evaluative meters do accomplish most of the time is to expose the frame such that the portion of the frame at the focal point (quaintly assumed to be the subject) is exposed as a mid tone (or middle gray or Zone V in b&w speak). If that sounds like good ol' centre-weighted to you – well, in most cases there doesn't seem to be a whole lotta difference. The problem with this is that neither evaluative nor C/W makes any serious effort to prevent blown highlights (or underexposure, for that matter). If that's your photographic philosophy, you're laughing, but most of us look upon blown highlights and inky shadows as indicators of improper exposure and try exceedingly hard to avoid them. ETTR takes this one step further by saying not only should blown highlights and inky shadows be avoided, but the best exposure is the one that reaches the right edge of the histogram without going past it (this requires a bit of post-processing for many images, so not every one may want to go there).
An ever-increasing number of dedicated photographers have come to the same conclusion and wonder why there is no ETTR auto-exposure mode on their cameras. I don't know whether camera companies simply haven't caught up with this development in (high-end) customer demand or whether there are technical difficulties involved. What I do know is that Pentax does provide in-camera spot-metering, which can be combined with some other features to achieve roll-your-own ETTR.
Both my previous DS and my current K20 have 3.0 stops highlight latitude, which leads me to suspect this is a Pentax dSLR standard. You can check this for yourself, using the simple procedure explained here. One complication is that the Pentax spot meter is something like 2 percent of the frame, indicated by the central circle in the finder, rather than the 1 degree of the scene of a handheld spot meter. No problem if you're metering off an area larger than the spot, as in Fig. 5a. But if you're trying to meter a small bright region surrounded by a darker region (or vice-versa), as in Fig. 5b, the spot meter's relatively large area will take in both the small bright area and some of the dark surrounding it and come up with an averaged, lower value. Again, you can check this for yourself by choosing a small but bright subject, metering it from a distance so it takes up half or less of the metering circle, then moving in close so it fills the entire metering circle, and comparing the resulting exposures.
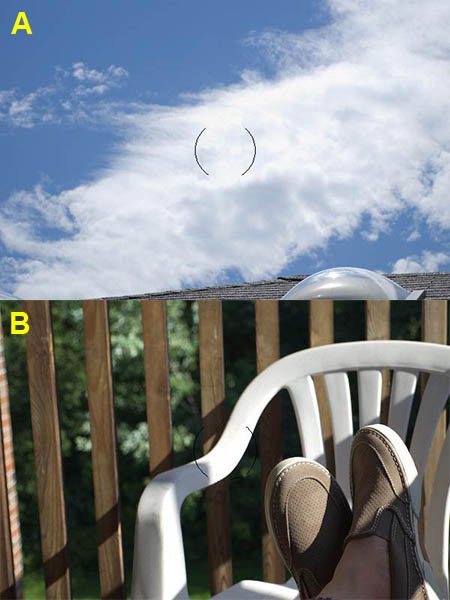
Fig. 5. A = highlight area larger than spot circle. B = highlight area smaller than spot circle.
The upshot of all this is that you can roll your own ETTR by finding the brightest portion of the scene then exposing it 3.0 stops higher than the suggested spot meter reading. But if what you're metering as the brightest portion of the scene is smaller than the meter circle, you'll need to fudge that and use 2.5 stops compensation (or even 2.0 in a really extreme case). Since you're shooting RAW, however, you can simply ignore the problem and retrieve the small amount of blown highlights in your RAW converter. I'll assume you're doing this and stick to the simpler +3.0 compensation hereafter.
That's the concept. Now the execution. There are actually no less than three approaches you can take to get to the same ETTR end. First, let's look at the portions they all have in common:
- The blinking highlights/shadows and the histogram in playback are extremely useful for chimping your exposure (chimping = taking a best-guess shot, checking it in playback, adjusting any exposure errors, then re-shooting). These are both based on what the JPEG engine in the camera would spit out if you were shooting JPEG ... even though you're shooting RAW. The standard JPEG settings pump up the contrast to add the punch that novices love to see. For this reason you need to dial back the JPEG saturation to -4 by pressing the Fn button then the OK button then using the arrow keys as needed. (This is a Record menu function on the previous K-series models and the range does not go as far as -4.) Having done this, your blinking highlights/shadows and histogram will be very close to reflecting what you'll see when you look at the same image in your RAW converter. (You can leave sat = -4 there permanently; your JPEGs will be all the better for it.)
- If you have your camera set to work in 1/3 EV steps, go into the Custom Settings menu, choose 2. EV Steps, then change it to 1/2 steps. You'll need this because Pentax only allows +/- 2 stops compensation in 1/3 steps, but allows +/- 3 stops in 1/2 steps.
Procedure A: Spot Manual
- Set your mode dial to M and the meter dial under it to spot. Don't you feel better now? Only real men use Manual mode and spot metering. When in the company of other photogs, make sure you dangle your camera in such a way they can all see that sexgutsy y M on the mode dial. ;)
- Press the +/- Exposure comp. button on the back of your camera and dial in +3 stops compensation.
- Take your best guess as to the brightest part of the scene that you plan to include in your next frame, look through your finder, center it in the frame, then press the green button to the left of the shutter release. This will zero the exposure on that spot. Continue looking through the finder, pan about the frame looking at the meter scale to make sure nothing in the scene is brighter. Once you've zeroed on the brightest spot in the frame, you've got your ETTR exposure value set.
- However, the combination of shutter and aperture may not be what you want for DOF or whatever. Go into the Custom Settings menu again and choose 26. Green button in TAv & M. Select Tv shift if you normally want Av-type exposure with constant aperture but varying shutter. Or select Av if you want the opposite. Pentax engineers are nothing if not accommodating.
Spot Manual downside: it takes away your ability to change ISO using a thumb wheel forcing you to resort to the Fn menu for every ISO change.
Update (03 Jul '08): Infinite thanks to Matthew Lathrop for pointing out that holding down the OK button while rotating the front e-Dial changes the ISO. So no more downside – and I suspect I'll be living in manual mode from now on!
Procedure B: Spot Av
My money is on Av as the most-used of all settings on the mode dial by experienced photogs. M may be macho but Av is easy. But Av is only easy because we use it in conjunction with evaluative metering (or centre-weighted if you go back far enough).
- Set your mode dial to Av and the meter dial under it to spot.
- Press the +/- Exposure comp. button on the back of your camera then dial in +3 stops compensation.
- As usual for Av, set your aperture if it isn't already what you want.
- Looking through the finder, pan the scene you plan to include in your next frame, looking for the fastest shutter speed as indicated bottom left. When you find it, press the AE-L button on the top right back of your camera. That's your ETTR setting.
(Optional: choose Memory, the last option in the Record menu. Turn on EV Compensation so your camera remembers your +3 comp. setting from one session to the next.)
Spot Av downside: there is no way to retain the exposure setting from shot to shot. Major down check for Pentax. ;(
Procedure C: Spot User
- Follow either procedure A or B. Once you have your camera set up for it, go into the Set-up menu, select USER, then press OK to save your settings.
- Whenever you want to do ETTR, switch the mode dial to USER, set the metering dial to spot, and proceed as above.
ETTR spot metering becomes both quick and easy with practice but it is not instantaneous. I always try to leave my camera set to Av, evaluative metering, f/8, and ISO 400. This gives me the closest thing to instant-on readiness should I need to take a fast grab shot from a cold start.
Maximize DOF
For your convenience I've copied the following from the text box on page 2 of my K20D review.
Fig. 6: Deep scene, huge DOF
One of the great advantages of using a smaller format (APS-C) camera for landscapes is the increase in DOF that comes from using wider glass. The more of your picture that's within DOF the more of it that's sharp.
The first thing I did was shoot a series of frames with the K20D at varying apertures to confirm that f/8 was indeed the narrowest aperture (and therefore greatest DOF) before diffraction blur started wiping out any gains. From what I've read, diffraction actually begins at f/7.1, but I only tested whole stop apertures.
In years past the standard operating procedure to maximize DOF was to focus at the hyperfocal distance. But this has fallen prey to a combination of every more diminutive COC and ever greater scarcity of lenses with the necessary combination of distance and aperture scales.
We know that any given amount of DOF extends 1/3 in front of the focal point and 2/3 behind it. But the wider the lens the greater that 1/3 in front becomes. To understand the capabilities of the K20D, I took a series of shots of a really deep scene like Fig. 6 at varying focal distances and with varying focal lengths of lens. Coming from a 35mm background I was used to focusing about 1/3 into the frame. To my total amazement I found with the K20D that it was hardly possible to focus too far back in the scene using the 16-45 lens.
If maximum DOF is important to you, I urge you to do a set of test shots yourself to get a feel for how far back in the scene you need to focus.
Control Exposure Shift
This entry is courtesy of Bryan Middleton.
The Pentax Green Button (GB) has several functions. One of these functions is to determine exposure shift for both Exposure Compensation and Exposure Bracketing. The GB can be set for either Tv, Av, or Program shift. For the K20D, these settings are selected in Custom Function 26. Both Av and P shift will adjust the aperture. Tv shift only adjusts shutter speed and is the correct setting when a constant depth of field is desired. Being able to control the depth of field is important for landscapes and is critical for HDR brackets.
* * *
And that's all for now, folks. Follow the simple steps above and you'll never again take a less-than-stellar photograph ... well, maybe not ... ;)