Street Secrets of the E-P1 and E-P2
An all-semi-manual approach
Page 2. Version 1.0, ©2010 by Dale Cotton, all rights reserved.
Secrets 1: Minimize Kit
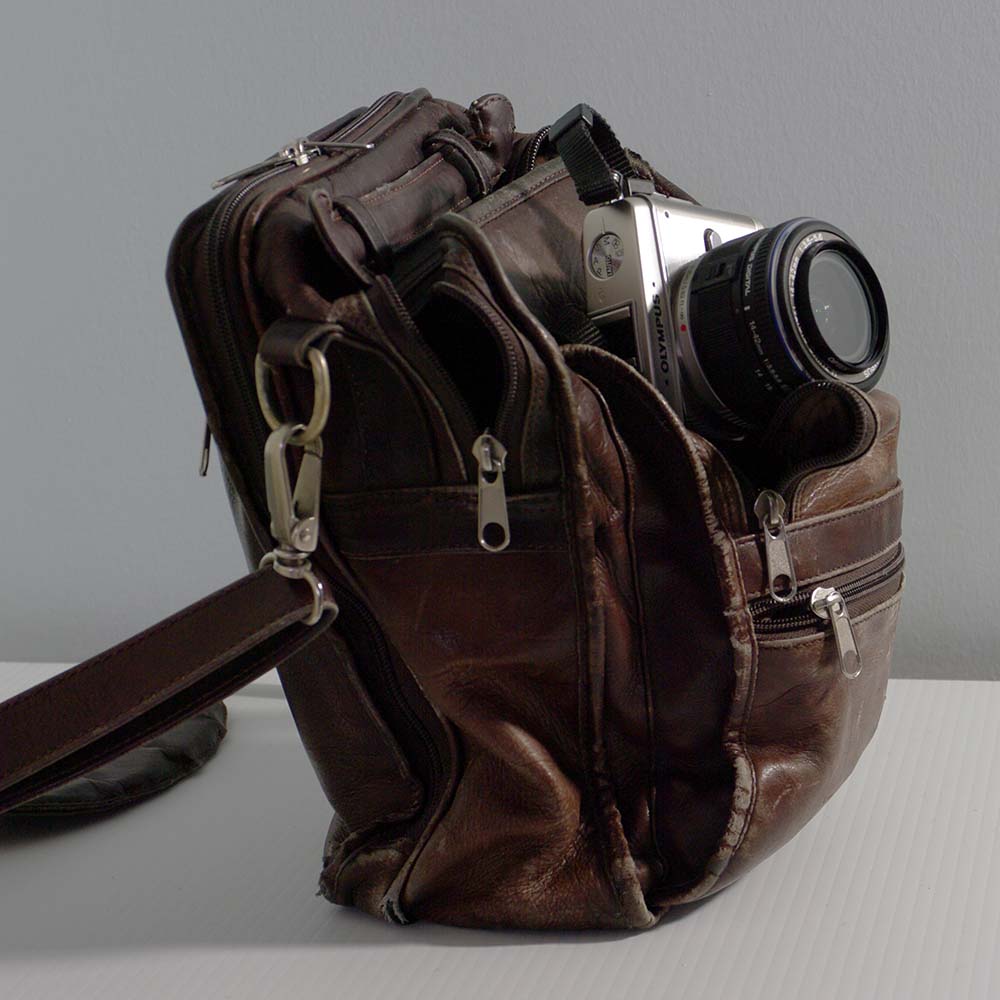
E-P1 and shoulder bag
Minimum kit. One thing important for a carry-everywhere camera is to in fact carry it everywhere. My E-P1 plus kit zoom lives in a compartment of my battered old messenger-style shoulder bag, along with Lens Pen. soft cloth, and USB cable. Since I rarely leave the house without the bag, I'm rarely separated from the camera. At one pound for camera alone and maybe three or four pounds for the full bag including camera, I can carry it all day long without noticing it's presence. Since the bag doesn't look like a camera bag, it doesn't shout "steal me" to thieves. Since there's only the one familiar bag, decades of habit ensure it doesn't get left behind.
Actually, the thing that kills portability for most avid photogs, is not the camera body but the gargantuan collection of lenses that tag along. So let's get this straight. If you're taking your FF dSLR on a photo safari, by all means stuff everything from that fish eye to the 500mm/2.8 prime in the bag, then add the tripod and laptop. When you're packing a carry-everywhere, you want a light-weight body plus a single small, slow zoom, or at most a couple pancakes. Yes: you might truly regret not having that super-wide-angle or that super-tele about twice per decade. But if you pack them for day-to-day use, the whole kit will soon end up on a shelf and no pictures will get taken.
Fast out of the gate. Another import thing for a carry-everywhere camera is reducing time from camera off to first image captured to the absolute minimum. I leave a UV protective filter on the lens instead of a lens cap to eliminate that little extra time needed to unclip and pocket the lens cap. (No: the filter does not slow AF, reduce light levels, or degrade IQ.) The kit zoom needs to be manually extended at start-up, so I've practiced pressing the power-on button and extending the lens until doing so in a single fluid motion has become second nature.
A bit of tape. Turn on the camera. If the funky green ring light around the power button bothers you, cover it with a square of opaque tape.
Strap pulled taut = 3 points of stability (E-P1 + kit zoom, 800 ISO)
Stability. Hold the camera as close in front of you as you can while still being able to read the text on the LCD panel. If that distance is greater than 18 inches or so, you probably need to wear corrective lenses. Otherwise, adjust the neck strap to that length. Now, with the camera on the strap and the strap around your neck hold the camera out and a bit below eye level, then pull out until the strap pulls taut against the back of your neck. You've now got those precious three points of stability that viewfinder addicts natter on about endlessly. Lower the camera further then raise it above eye-level: notice that viewing angle has no effect on the view-ability of the LCD.

Real-time histogram
Real-time histogram. On the back of the camera at the bottom find the Info button. Press it repeatedly if needed until the on-screen histogram shows. As mentioned, working with a real-time histogram is a game-changer for anyone who loathes blown highlights, so spend as much time as needed moving with the camera into different lighting conditions, while thumbing the circular thumb dial to shift the histogram left and right.
Secrets 2: Maximize Control
10-0801 (E-P1 + kit zoom, 1600 ISO)
The Leica M rangefinder has long been the ideal tool for street and candids. Using a Leica M is simplicity itself: set ISO when changing film, change focal length by changing lenses, set aperture on the lens ring, set shutter speed on the top plate dial, adjust focus by turning the focus ring on the lens. More recent M models even have a nifty TTL meter needle in the finder to take (most of) the guesswork out of determining the ambient light level.
In 2002 Leica introduced its first M-mount camera with aperture priority, the M7 ... a mere three decades after Av had taken the rest of the industry by storm. Forget how many years you've happily been using Av, Tv, or even program shift. From here on in I'm going to attempt to convince you that all-manual control and the E-P1/2 go together like pastrami and rye.
A one-time set-up
To accomplish this feat, I need you to perform a bit of radical surgery deep within the innards of your camera's menu system. As you change each menu option, make note of the previous setting so you can revert to your prior set-up if needed. Set any menu options I don't mention to taste. Grey options show my own preference but are not critical to the methodology being discussed.
Live View options:
(Press the OK button to activate, then use the left/right/up/down rocker as needed)
- WB: Auto (but pre-setting a balance improves performance)
- Shutter mode: Sequential (I'll have more to say about this soon)
- IS: 1
- Output: I use Large Normal+ RAW
- Meter: ESP or CW
- Focus: Manual
- ISO: as appropriate but not auto, since I want to be able to operate at low shutter speeds
- Face detect: Off
- Focus area: (single centre point)
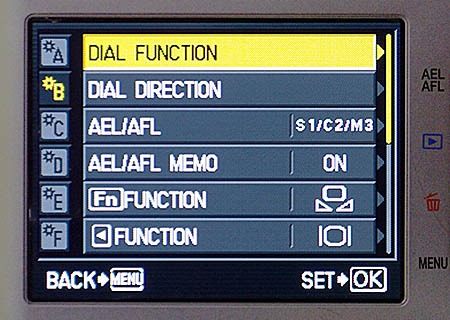
Somewhere deep in the bowels of the E-P1's menu tree
Spanner/set-up menu:
(Press the Menu button to access then the up arrow to jump to the spanner icon)
- Rec View: Off
- LCD brightness: +7 for bright daylight; 0 indoors (I just leave it at +7 and turn off the LCD when not in use to save battery power)
- Cog menu display: On
Cog menu:
A:
- AF Area: centre/single
- MF Assist: On
B:
- Dial Function: M – top dial Fno, bottom Shutter
- AEL/AFL: [S1/C2/]M3
- AEL/AFL Memo: On
- Fn Function: one-touch WB [Backlit LCD]
- Left arrow Function: Backlit LCD on/off [Metering]
- My Mode Setup: (unused)
- Button Timer: 3 sec
- AEL/AFL<->Fn: Off
- 4-Way Function: On
D:
- Sleep: I use 1 minute
- Live view boost: Off
- Info: right arrow: I have all set to on
- Info: live view: I have histogram and image only on
E:
- EV Step: 1/3
- AELMetering: Auto
- ISO Step: 1 EV
I'd like to say: now that wasn't so bad, was it? but I can't. While I fully appreciate all the customization options, there's no getting around that the E-P1/2's menu layout is about as arcane and bizarre as they come. I'm not sure what they were smoking that day on Mt Olympus, but it must have been some pretty heavy stuff. The good news is that, between the live view menu and the wealth of dedicated buttons and dials, you may never need to go back into that maze again.
Now for the crucial step:
Mode dial
:(top plate, left)
- mode dial: M
You can leave it there for all eternity unless you shoot video.