ETTR Is Critical For High ISO Photography
Page 2, version 1.2, © 2009 by Bryan Middleton, all rights reserved.
Comparing In-Camera High ISO Noise Reduction
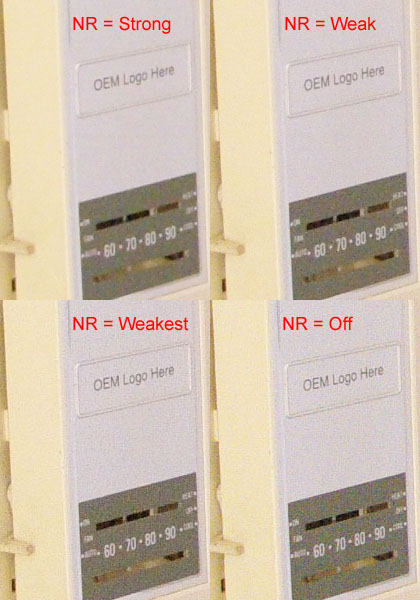
Fig. 5: ISO = 3200, noise reduction series, 100% crops of thermostat
All of the Exposure Compensation test images (labeled in the first section with EC in red) were taken with High ISO Noise Reduction = Off. Here, I have taken a few more images at EC +2 to compare the High ISO NR settings of the K20D. (Of course, other cameras will have different in-camera JPEG noise reduction options, but I assume my results using the K20D will be fairly typical.)
The crop labeled Strong does have less noise, but the detail is also lessened: the thermostat labels are not legible and the degree markings are softer. Remember, these are 100% crops. The noise level of the NR = Off image is already low. For me, it appears Weak would be the best compromise. But, there are four levels to suit different tastes. As far as I know, these noise reduction levels only affect JPG images and RAW images will be closer to the NR = Off result.
Why Not Just Use ISO 800?
The simplest question about all of this would be "Well, if you are going to give up two stops to reduce noise by exposing the ISO 3200 image at EC +2, why not just shoot at ISO 800? For the ETTR ISO 3200 shot, you use a shutter speed of 1/8 second (metered exposure and EC +2). An equivalent exposure using ISO 800 with no EC, will also require a shutter speed of 1/8 second. And we all know an image shot at ISO 800 will have less noise from the start. So what is the benefit here?"
For any ISO, exposing the image to the right will reduce visible noise. If I am going to stay in the hallway, my choice would be simple. I would use ISO 800 and expose that to the right and have really low noise. Based on my metered exposure of f/3.5, ISO 3200, I would need a shutter speed of 1/2 second to use ISO 800 exposed to the right. But, what if I am out somewhere and want to use the highest shutter speed possible along with an ISO and exposure compensation that will give me good image quality?
To answer this, I went back to my hallway at a similar time of day for more thermostat pictures. The images that follow were taken with the same settings as the ones above. Metered exposure = f/3.5, ISO 3200, 1/30 seconds.
Imagine I am taking these shots in a museum. My kit lens will do no better than f/3.5. Flash is not allowed and I need 1/15 second for a handheld shot. I may be able to hold steady at 1/8. I consider my options for equivalent exposures, spot meter my subject, and take some test shots. The exposures for my target shutter speeds (Fig. 6 and 7, below) are equivalent. If I use a shutter speed of 1/8 second, the following are all equivalent:
- ISO 3200 & EC +2
- ISO 1600 & EC +1
- ISO 800 & EC +0
Similarly, the following exposures for 1/15 of a second are also equivalent:
- ISO 3200 & EC +1
- ISO 1600 & EC 0
- ISO 800 & EC -1
Thus to get 1/15 of a second at ISO 800, I had to underexpose the image EC -1. The image was quite dark so I lifted or lightened the shadows with Photoshop (Fig. 6, Crop #4). The goal of this test is to use the fastest shutter speed possible. Many consider that underexposing to gain shutter speed and then lifting shadows in post-processing is a valid technique (the digital equivalent of push-processing in the wet darkroom).
Each of the crops below show the thermostat and a little square in the upper left-hand corner. The little square is a small crop from the extreme left-hand corner of the full image. I pasted it on top of the thermostat to save room. They are large enough to show the noise and light levels in the corner. These were taken with the 18-55 kit lens so there is a noticeable vignette.
Interpreting the unprocessed results
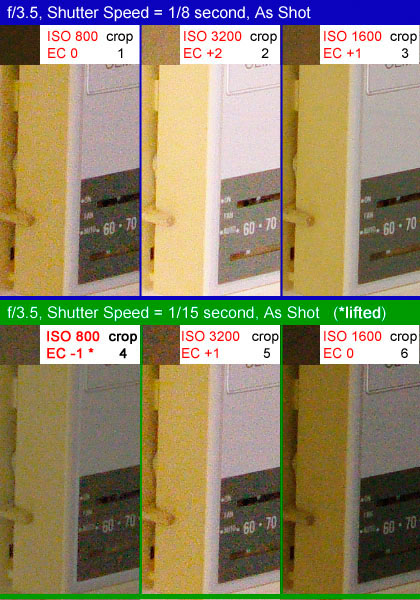
Fig. 6. Straight from the camera
Of the 1/8 second images, I think Crop #2 looks best. The corner is brighter and the subject is at least as good as, if not better, than either of the other two crops. I could have used EC +1 with Crop #1. Crop #1 would then have looked better than Crop #2 but my shutter speed would no longer be 1/8 second (it would be 1/4 and my hands are not that steady).
Of the 1/15 second crops, I think Crop #5 looks best. The corner crop is a little messier than Crop #4 (even after it is lifted). But, I metered for the thermostat; it is my subject and I think Crop #5 looks best. In a difficult lighting situation, this is the best I can do. Selective noise reduction applied in post-processing to portions of the image outside the subject area or even cropping would help the corners.
For Fig. 6, I found that Crop #5 looks as good as Crop #1 and I was able to use a stop faster shutter speed. For Crop #2, I used the same shutter speed as Crop #1, but #2 looks brighter and smoother. Compared to metered ISO 800 (Crop #1), ISO 3200 exposed to the right (Crops 5 & 2) allows me to use either a faster shutter speed with the same image quality or the same shutter speed with better image quality – shooter's choice. I think this is significant.
Interpreting post-processed results
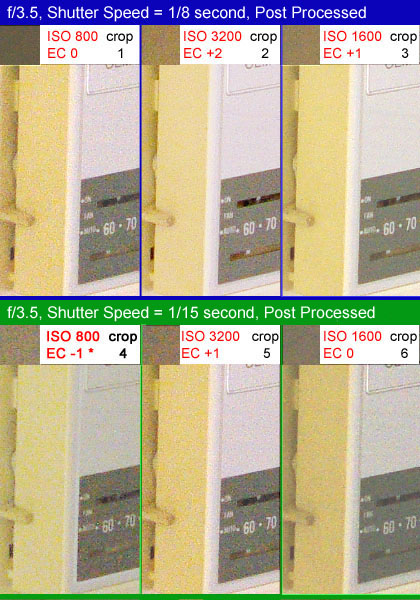
Fig. 7. Matching brightness levels
The crops in Fig. 7 are the same as those in Fig. 6, but now a bit of post-processing has been applied to even the playing field. Each crop has been separately adjusted by eye, using Photoshop's simple Brightness/Contrast control, to get them to essentially the same level of brightness.
For the 1/8 second series, I think both Crop 2 and Crop 3 are better than Crop 1. Compared to metered ISO 800, exposing a higher ISO to the right still offers an advantage.
For the 1/15 second series, the advantages apparent in Fig. 6 are not as clear. To my eye Crop 6 now has the advantage. Crop 6 is at EC +0. If I exposed Crop 6 to the right, it would look even better. But, my shutter speed would 1/8 second and 1/15 is the target for this particular shooting environment.
The Total Package
As I put this article together and worked towards my conclusion based on Fig. 6, I thought I had a universal result. I was ready to share a formula that would maximize image quality and shutter speed. I learned there is no formula.
If I don't want to post-process my images, the conclusion based on Fig. 6 is valid. After post-processing, I draw different conclusions based on Fig. 7. Both conclusions are real. There will be another conclusion for images recorded in RAW. That conclusion will also be real. What I have learned is that I must consider the total package, which includes more than the image recording capabilities of my camera. In addition to hardware, the total package includes the subject, the lighting environment, and the method of processing.
Following Fig. 6, I was ready to wrap things up with a "your mileage may vary" comment. Now I'd say: your mileage will vary. My article began as an exploration of the benefits exposing to the right has on high ISO images. My article concludes with an additional message: Take the ideas in this article and expand upon them. Perform tests that suit your over-all style of photography. If an element of your style changes, perform the tests again.
– Bryan Middleton, 2009 (Flickr album)