Camera (very) Fundamentals
Version 3.1, © 2002, 2006, 2009 by Dale Cotton, all rights reserved.
Lesson Two: Shutters and Exposure Times
To get an image on a frame of film or on the sensor in a digital camera we need to precisely control the dose of light that reaches it, and we have two separate tools to do that job – the shutter and the lens aperture. But first, let's get even more basic than the Nikon F2 and imagine a camera without these tools. The simplest possible camera (camera means room or chamber in Latin) is a light-tight box with film inside at one end and a lens at the other. (We use film instead of digital so we don't need to muck around with electronic circuits and batteries.) Let's call this the Mark I camera:
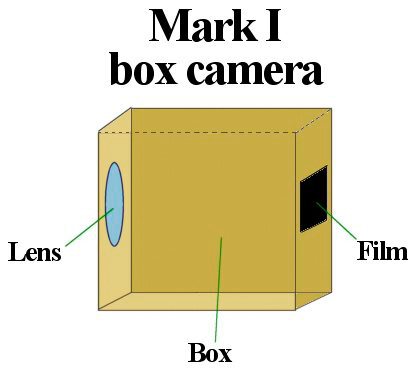
Fig. 5: The Mark I box camera
However, a camera that simple isn't light-tight since the lens is made of clear glass. To take a picture with the Mark I camera you have to:
- Put the film inside the camera in an absolutely dark place.
- Carefully cover up the lens with your hand for the entire time you have the camera in the light.
- Point the camera at the subject you want to photograph.
- Take away your hand for a brief time to let light bounce off your subject and through the lens and onto the film.
- Put your hand back over the lens, leaving it there until you can get the camera back into the dark.
- Remove the film and store it in a light-proof container in which to take it to the drug store for processing.
Clearly this hand-over-lens business would get old very quickly. So instead we make a Mark II camera.
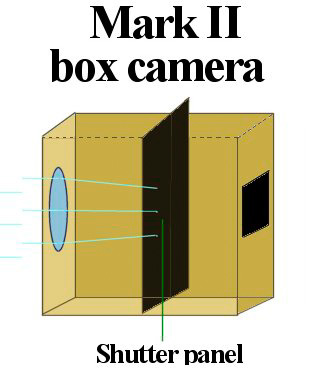
Fig. 6: The Mark II box camera with removable shutter panel
This model has a panel inside the box that keeps the film portion of the box dark (no light from the lens can get past the panel to reach the film), but the panel sticks out far enough past the side of the box so we can grip it. We can pull the panel out to let light from the lens hit the film then push it back in to block the light again. We call such a panel a shutter; it's the mechanical equivalent of an eyelid or blindfold for the film. Now we can happily use our box camera 'til the cows come home without worrying about keeping a hand over the lens all the time.
Your turn: No: I don't expect anyone to actually make a box camera! although it is a fascinating exercise, and you don't even need a lens. The traditional approach is to make and use a pin-hole camera instead.
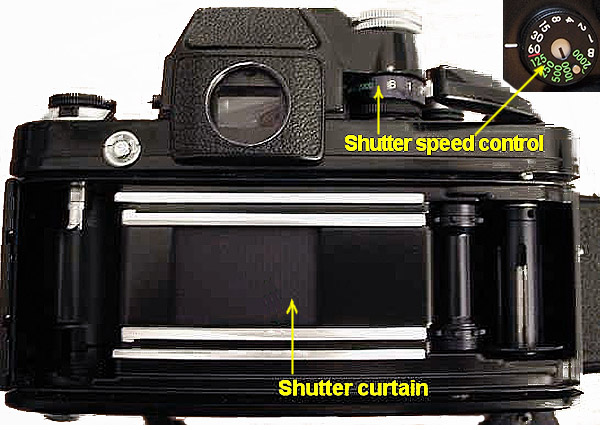
Fig. 7: Modern camera shutter
A modern film camera and most digitals have an automatic shutter that is spring-loaded. When you press the picture-taking button on your camera, called the shutter release, it lets the shutter snap open for a specific period of time then snap shut again. When the shutter is open the light coming through the lens is no longer blocked and shines on to the rectangular portion of film just behind the shutter window. (Modern shutters are actually more complex even than that, but this is enough of the idea to get by with until you get into flash photography.)
Digital: Digital cameras also have shutters. The technology used varies from model to model, but they nevertheless perform exactly the same function as described herein.
To use a shutter panel to control how much light reaches the film we set the shutter speed control. We might set it to let light hit the film for 1/500th of a second, for example. Modern shutter speed controls have a standard scale of possible exposure times:
2' - 1' - 1/2' - 1/4' - 1/8' - 1/15' - 1/30' - 1/60' - 1/125' - 1/250' - 1/500' - 1/1000' - 1/2000'
Many cameras have longer choices, such as 4 sec. or 8 sec. (on the left); and some have shorter choices, such as 1/4000 sec. (on the right). The Nikon F2 was an advanced professional camera back in 1972. Looking at the inset in Fig. 7, you can see that all the shutter speeds in the list above – except for the 2 second setting – are marked on its shutter dial.
Key fact: the shutter speed choices are just like ISO ratings: each one doubles the one before it and halves the one after it (with a bit of fudging here and there to keep from having to use fractional numbers).
Confusing fact: Recent cameras provide even finer gradations between the standard shutter speeds listed above. For example, my Nikon F2 from 1972 has the doubling/halving scale shown above, but the Nikon F80 has a half-way choice between each. For example, there is a 1/45th second setting between 1/30 and 1/60. Most professional film cameras actually divide each step into thirds, which was necessary due to the exacting exposure requirements of slide film. Most digital cameras offer the thirds option as well.
Your turn: Many but not all digital cameras have a setting labelled S for shutter priority on the mode dial. This setting lets you set the shutter speed you want, which remains in place from shot to shot, and the camera in turn controls the aperture. This is useful when you want to freeze action, such as in sports, or when you want to blur action. If you are photographing a race car in motion, for example, stopping the action makes the car look as though its parked. So you might use shutter priority set to about 1/60 and pan the camera to follow the car. If your hand is steady enough this gives you a sharp picture of the car but the tires and background are motion-blurred.
If you camera has shutter priority, experiment with using that to take pictures of a moving object at various shutter speeds from about 1/30th sec. to 1/500th.