Quick, Accurate High Contrast Exposures
for Digital Cameras
Page 3. Version 1.3, ©2006 by Dale Cotton, all rights reserved.
X marks the spot

Fig. 8: Typical exposure series for finding X
The next step is to determine X for your particular camera, where X is distance between the blown highlights mark and the exposure level your camera suggests via its spot or centre-weighted meter. Experience shows that this is not simply the latitude (DR) of your camera divided by two. The latitude of my LX1 is somewhere around 7.5 stops, but the spot meter weighs in at 1.5 stops under the highlight clipping point. Fortunately, 'tis simplicity itself to find your camera's X value. Here's the drill:
- Frame a scene in high contrast light.
- Switch to spot metering.
- Meter off the brightest part of the scene then press the shutter release.
- Add the minimum amount of + exposure compensation (usually 1/3 stop), press shutter.
- Continue adding + exposure comp. until you reach the limit of the camera or have obviously saturated the brightest part of the scene.
- Evaluate using histograms in your raw converter or editing app to find which exposure first caused the brightest part of the scene to blow.
That exposure compensation value is X. X happens to be 1.5 stops on my LX1 and 3.0 stops on my Pentax DS. (You only have to do this once per camera and it isn't rocket science.)

Fig. 9: Brightest portion of scene is pure white paint under the deck, metered at +1 2/3 with LX1, and allowed to spike.
So let's say you're shooting with a Nikon D50, you've found that X=3.0 for your camera (I have no idea what the actual X would be for a D50), now you want to put this to use. We know that the concept is to spot meter the brightest portion of the scene then add 3.0 stops to whatever the meter recommends. Since exposure compensation on the D50 is a whopping -/+ 5 stops, one can use aperture or shutter priority, leave exp. comp. set to +3, press the AE Lock button when the meter is pointed at the brightest (non-specular) spot in the scene, then recompose and shoot as desired. Other cameras have the more typical -/+ 2 stops exp. comp., so if X is greater than 2.0, one would have to use manual mode, dialing in either shutter or aperture, over the meter's recommendation.
Putting it all together
Example 1: Pentax D series (X=3.0)
- If light is contrasty and your subject matter permits a second or two for metering each time you change to a new lighting situation, use the following recipe. Otherwise use multi-metering and whatever you would normally do.
- If necessary, switch to manual mode and spot metering.
- Point your camera at various candidate locations for the brightest portion of the scene.
- Observe the -/+ number bottom right in your finder.
- If the number exceeds +3.0 the number will flash. Dial in minus shutter or aperture until it reads a non-blinking 3.
- Re-compose and shoot.
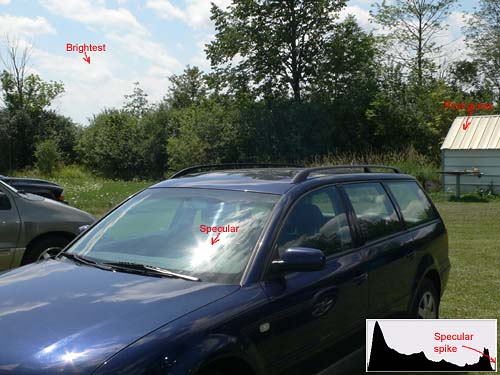
Fig. 10: First guess was shed roof but sky proved brighter; specular glare on windshield ignored.
Example 2: Panasonic DMC-LX1 (X=1.5)
- If light is contrasty and your subject matter permits a second or two for metering each time you change to a new lighting situation, use the following recipe. Otherwise use multi-metering and whatever you would normally do.
- If necessary, switch to aperture or shutter priority, spot metering, and set exposure compensation to +1 1/3 or +1 2/3 (your call, since 1.5 is not an option).
- Point your camera at various candidate locations for the brightest portion of the scene.
- Press the AE Lock button or half press the shutter release to get a reading, repeat until you know which portion of the scene is brightest.
- Leave that exposure locked in with AE Lock or half shutter.
- Recompose and shoot.
- Press AE Lock again to turn it off.
Both these procedures sound much more complicated written out than they actually are. A bit of practice will make them second nature. Generally, the most tedious part is switching back and forth between this and multi-metering for action shots. Hopefully, you can hit on some equally efficient method for achieving the same results with your own model camera. If so, e-mail it to me and I'll append it to this tutorial and include your name as discoverer.
(For a more comprehensive exploration of metering theory and practice, see my tutorial: Existing Light Exposure Metering.)