Existing Light Exposure Metering
Page 4. Version 2.2, ©2003, 2005, 2009 by Dale Cotton, all rights reserved.
Scenario 2: metering a non-averaging, low-contrast scene

Fig 7. 44-18
The first thing to notice about Fig 7 is how much brighter the scene is than our previous example, Fig 5. Compare the averaging blurs from Fig 6 (B) and Fig 8 (B), clearly Fig 8 (B) is brighter. As a whole, this scene is roughly a whole stop brighter than middle grey. Any daylight frame that includes large areas of sky is a potential problem, and in this image the entire scene is further brightened by dawn mist. Using a spot meter on the bit of grass at lower left will skew things because the mist has lightened the grass. In theory, an evaluative meter should meter this scene correctly. An averaging meter will read roughly one stop of under-exposure because the scene as a whole is roughly a stop brighter than middle grey.
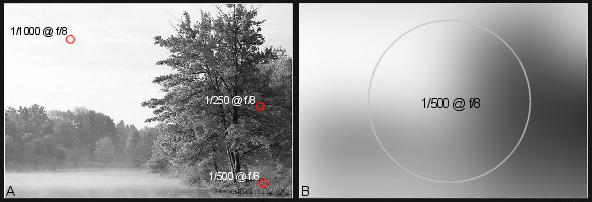
Fig 8. Same image showing (A) spot readings and (B) centre-weighted average reading
An averaging meter will tell us in essence that "to expose this scene so that it's average brightness equals middle grey use such-and-such a shutter and aperture combination".
If you don't have (or don't trust) an evaluative meter, you need to use your brain to do the evaluating. We have several choices:
- Recognize that the portion of the trees in shadow is close to a middle grey (or grass green) shade.
- Guesstimate that the entire scene is roughly a stop brighter than middle grey.
- Take a spot or close-up averaging reading off a grey card or other known brightness object (such as the palm of one's hand).
- Take several different frames at different exposures above and below the camera meter's suggested exposure, which is called exposure bracketing.
Snow scenes are also great examples of scenes that pose under-exposure risks. Because snow is brighter than middle grey, spot and averaging meters are going to read too dark. So the basic rule with snow scenes is to set your exposure between 2 or 2½ stops slower in shutter speed or larger in aperture than the reading from an averaging meter or a spot meter reading off the snow. But you need to use your judgment – metering snow in bright daylight is a very different challenge from metering snow at twilight.
A similar challenge but in the opposite direction are scenes that are primarily darker than middle grey.