Digital Editing 101
Following an Art Photograph from Capture to Print-Readiness
Version 1.3, © 2006 by Dale Cotton, all rights reserved.
Intro: I've received some requests lately for more introductory instruction on digital editing. In this tutorial I use RawShooter Premium and Photoshop but the actions should be easily reproducible using a variety of raw conversion and image edit products. SilkyPix, Adobe Camera Raw, Paintshop Pro, and Adobe Elements come to mind. Update 2009: And now, of course, Lightroom. Again: the RawShooter steps below are easy to reproduce in Lightroom, ACR, Capture One, etc.
This first tutorial will cover fundamental concepts applicable to the majority of images.
Capture
I took the picture romantically titled 06-2569 with my Pentax DS on a tripod along the Lake Ontario waterfront near where I live at dawn in mid-October 2006. This is a site I've worked many times and probably wouldn't have re-visited, except that I wanted to introduce it to a friend. Exposure was 400 ISO, f/8, 1/50th sec. As you can see from the small amount of red (blown-highlights) warning, the exposure was pretty accurate in an expose-to-right kind of a way.
One interesting thing about this image is that its dynamic range is less than that of the camera. Notice that the histogram does not reach all the way to the left edge. Because the exposure pushes the histogram all the way to the right edge of the histogram, we are avoiding the noise and the lack of tonal gradations that live on the left/dark side of the Force.

Fig. 1: 06-2569 as shot then opened in RawShooter
Raw Conversion
Opening the pic in RawShooter, first I cropped the frame slightly to change the aspect ratio to 7:10 and to emphasize the composition that I see as the small acolyte tree on the left edge bowing in respect to the large Old Master tree on the right edge. ;) (Cropping and composition are of course personal decisions that no two of us will ever fully agree on.)
I normally leave white balance at auto, which proved a mistake for this shoot, as you can see from the extreme colour temp correction I had to introduce and which still did not entirely neutralize the image.
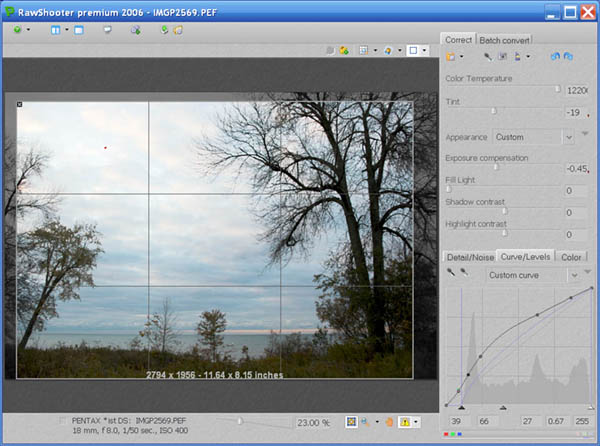
Fig. 2: RawShooter adjustments
Fig 2 is the final set of raw adjustments for this pic. A small reduction in exposure eliminated nearly all the blown highlights. In the curve tool I set the black point and the mid point then added a curve to further open the dark areas without lightening the sky. We can see that another challenge of this shot will be to deal with the darkness of the land and trees while keeping the sky from going too bright.
If there was significant noise I would deal with that now, otherwise time to convert and send to Photoshop as a 16-bit TIFF. (If you want to follow along, download this file. It's a 75% downsample of the 16-bit TIFF converted to a 524 KB JPEG.)
There are various philosophies regarding how much editing to do in the raw converter and how much to do in the image editor. The raw converter has direct access to the raw data, so my approach is to spend the time to get colours and contrast as close as possible to my final goal in the raw converter. The more extreme the modification, the less distortion will be introduced in the raw converter before TIFF generation than after.
Why 16-bit? In 8-bit image formats, such as JPEG, each colour number is specified as being in the range from 0 to 255. If you apply something like a curve to such a pixel the curve might say "darken the colour by 43.41%. If the original colour happens to be, say, 133, then the new colour will be 133 x 43.41 = 57.7353. But only whole numbers are allowed so the new colour will be rounded to 58.
In a series of such operations the rounding errors can accumulate, resulting in what is called posterization or banding. This looks like streaks of colour instead of smooth transitions and is often seen in sky. Banding is simply the most obvious manifestation of the problem; accumulated rounding errors affect everything.
16-bit formats store each colour as a number from 0 to 65535, so rounding errors are 256 times smaller and that much more likely not to have a visible effect.