Matting and Framing Crash Course
Page 5, Version 5.3, ©2010 by Dale Cotton, all rights reserved.
Cutting the Overmat
Enough hot air: time to get to work! First I cut a piece of mat board to the frame size (18" x 24"). Next I measure the printed dimensions of the print. For example, I may have half-inch margins on a 13" x 19" print so the printed area is actually 12" x 18" (see Fig. 8a).
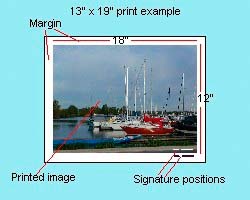
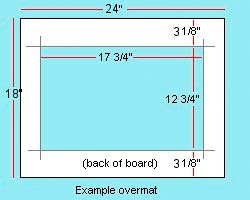
Fig. 8a: Print dimensions, 8b: Overmat dimensions
Here you have another aesthetic decision to make (Fig. 9a and 9b). Do you want your mat to snug up to the edge of the image on the printed paper or do you want a narrow border of blank paper separating the two? Traditionally water colour artists will sign and perhaps date and number their work on the margin just on the lower left or lower right edge of the painted portion of the paper.

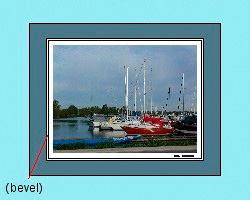
Fig. 9a: Overlapped and Fig 9b: signature border overmats
I then use a pencil and ruler to mark an 11¾" x 17¾" rectangle on the back of the mat board leaving equal margins all around (Fig. 8b). 11¾" instead of 12" because it is nearly impossible to perfectly line up the finished over-mat with the the print area. If you are leaving a white border around the print area, you would instead mark a rectangle of, say, 12¾" by 18½". That's a quarter inch extra all around except for the bottom, which is ½" to accommodate the margin signature.
So, if my print area is 12" x 18", and my frame is 18" x 24", there will be a 3 1/8" margin above and below my pencil lines for width, plus (co-incidentally) 3 1/8" margins to the left and right of my pencil lines for height.
Update, Dec. 2009: Here's yet another little decision to consider:

Fig. 9c: Fully-centered vs. "optically-centered"
Hi Dale,
Just a little remark concerning your framing tutorial: measuring out the width and height of the mat, I would consider the 'optical middle' which is higher at the bottom of the frame, like for example both sides 3 cm, top 3 cm and at the bottom 4 cm – or any variation thereof. If the space around an image is the same all around, the image seems to 'fall off' the lower edge. This is quite obvious looking at your examples. Try it, it works and looks much better. Alternatively: Go to a good exhibit where frames/mats are used and look at the framing: the lower space is always wider than the top, sometimes only a tiny little bit. You would not notice it – it just looks right. If I order pre-cut mats in Germany, I can specify 3 cm at 'optical middle' and get 3 cm sides and top, bottom 3,75 cm. It is standard in the industry.
- a reader in Germany
As best I can determine having more space at the bottom looks right to some people and wrong to others. I suspect this varies by region. If you are matting and framing for your own use, of course go with whichever approach you prefer. If you are matting and framing work to show in a gallery or for sale to customers, you'll want to enquire which approach to go with. For simplicity, I'm going to leave the relevant portions of this tutorial showing the full-centered approach. If you opt for the off-center approach, simply adjust accordingly.
Now I need to cut out the centre gap for the picture (shaded aqua region in Fig. 8b) from the mat board. I have a large piece of masonite that I use as a work surface. I lay the mat board on the work surface, put a left-over strip of mat board between the uncut mat board and the work surface, to avoid scoring the work surface. (The blade has to extend deeper than the thickness of the mat board to get a clean cut; scrap mat board is used to protect the work surface because it will not dull the blade.)
I then line up the Logan straight edge along one of my pencil lines, fit the sliding mat cutter on the track, and pull it firmly toward me until I reach the other end of the cut. Switch to the next pencil line and repeat. At the end of the fourth cut the centre rectangle falls out leaving clean corners and a 45 degree bevel all around.
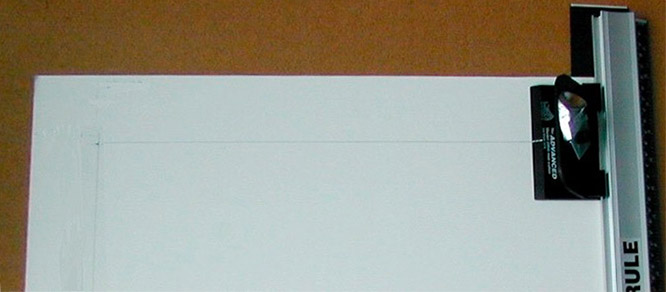
Fig. 10: Before cutting close-up
In the snapshot above we see the Logan tools on the job, just before a cut. Hopefully you can see the pencil lines. The end of a scrap of black cardboard under the mat board to protect the work surface can be seen sticking out at the top right. The cutter is hooked onto the ruler's left-edge track. The ruler's left edge is exactly aligned with one of my pencil marks on the mat back. The cutting tool has a silver right-angle line on its left side. This is aligned precisely with the right angle pencil line on the mat back at the beginning of a cut. (The cut ends when you've pulled the cutter until the silver line overlays the next right angle pencil line.)
Note: Change your blade frequently! A dull blade may tear tougher mat board surfaces and doesn't travel in a straight line.