Existing Light Exposure Metering
Page 3. Version 2.2, ©2003, 2005, 2009 by Dale Cotton, all rights reserved.
Scenario 1: metering a low-contrast scene
The problem, of course, is that what we really want to meter is not a grey card and rarely so simple a subject as a grey cat on a green lawn. Most scenes have a range of brightnesses in them, as in Fig 3. or more realistically, something like:

Fig 5. 52-16, overcast light scene in colour and as a light meter would see it
Grass green is generally fairly close to being a middle grey equivalent. Using the green lawn as a baseline, we see that the white stripes on the boy's shirt are brightest; the sky, parts of the slide and gravel are a shade brighter than the lawn; while the navy poles, trees, and shadows are all to varying degrees darker.
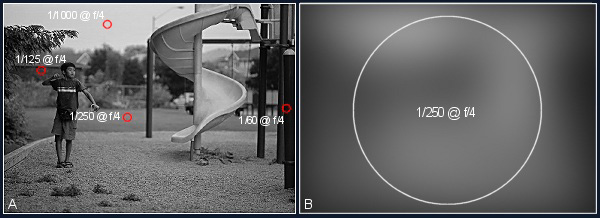
Fig 6. Same image showing (A) spot readings and (B) centre-weighted average reading
The red circles in Fig 6 (A) show approximately the size of the measured regions and readings I would have gotten if I had used a 1° spot meter on this scene. These range from 1/60th sec at f/4 to 1/1000th at f/4, which is a 4-stop spread – well within the compass of all modern imagers.
Low-contrast: any scene with a range of brightnesses that your imager can handle. (See dynamic range on page 5, below.)
To create Fig 6 (B) I used a Gaussian blur with a radius of 25 to simulate the averaging effect of a centre-weighted averaging meter. We can see that the blurred scene is roughly as dark as middle grey and that an averaging meter would therefore have arrived at the same result we would have gotten by using a spot meter on the middle grey equivalent lawn.
Centre-weighted averaging meters were built into 35mm SLR cameras for many years until the microcomputer revolution of the 1980s made possible in-camera evaluative metering. As we can see, a low-contrast scene such as Fig 5 poses no problems for an averaging meter.
When we press the shutter release to expose the camera's imager at 250th sec and f/4, the lawn and all other equivalently bright areas of the frame will receive the ideal amount of light (assuming the correct ISO is in use). The sky and other brighter areas will be somewhat over-exposed, which creates the necessary lightening of those areas in the resulting print (or other output). Similarly, the darker areas will be under-exposed to varying degrees, creating the necessary darkening of those areas in the resulting output.
Note: a properly metered frame is actually a mix of over-exposed, ideally exposed, and under-exposed regions.
If I had used an ISO of 100 the numbers would have been different than if I had used an ISO of 400. Similarly, if I had taken the shot in bright daylight the numbers would be different again; and if I had taken the shot at twilight or even at night they would have been different yet again. But in each case the relative differences between the darker and lighter areas would remain much the same. By using a high ISO sensor or by using multi-second exposure durations one can take pictures by moonlight or streetlight that keep the exposure level of the middle-grey-equivalent areas at the imager's optimum.