Existing Light Exposure Metering
Page 5. Version 2.2, ©2003, 2005, 2009 by Dale Cotton, all rights reserved.
Scenario 3: metering a high-contrast scene
On page 2, I wrote that there is some combination of shutter speed, aperture size, and sensor ISO that will perfectly expose a grey card in a given amount of light. That's grey cards. In the real world there is no such guarantee. Fig 9 is a perfect example of a high-contrast scene, which cannot be perfectly exposed because no film stock or digital sensor can handle the extremes of brightness it incorporates.
High-contrast: When the extremes of brightness in a scene exceeds the capabilities of your imager there is no ideal exposure and quite possibly no usable exposure.

Fig 9. 42-12
Notice first that where sunbeams fall on the grass the colour neg film used to take this picture – in spite its 11-stop latitude – has been totally over-exposed, turning the grass white. Grass blades are fairly shiny and so act as a mirror to reflect the intense sunlight into the lens of the camera. This is called specular glare and is even more of a problem with water, glass, and chrome. Specular glare can sometimes be toned down to a limited degree by using a polarizer, but otherwise it plays havoc with light meters. But specular glare is not the main problem for metering this scene. About half of the scene is extremely bright and the other half of the scene is correspondingly very dark.
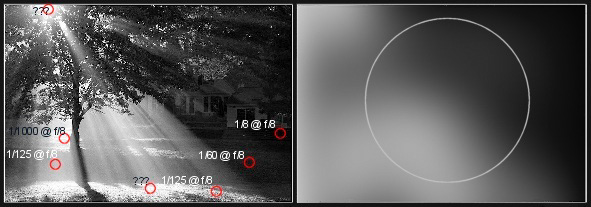
Fig 10. Same image showing (A) spot readings and (B) centre-weighted average reading
At first blush, center-weighted looks ideal. One problem is that (as anyone with an older camera learns from painful experience) even though the sun and specular glare represent only an off-centre fraction of the scene they will skew the reading dramatically toward under-exposure. We could use an incident meter but do we read light in the shadows or in the sun? We could use a spot meter to read off the grass ... but where? Notice that a spot reading off the sun or the specular glare of the grass will go right off scale. The grass in shadow and the grass in sunlight give different readings. An evaluative meter will likely give a usable reading (probably 125th) but not necessarily the setting you want.
A second problem with centre-weighted and incident in high-contrast situations is that there really is no middle-point or ideal exposure to target for. You will have to sacrifice some highlights and/or some shadow detail. It really comes down to a matter of judgement – do you try to minimize the amount of over-exposure of the lawn, which can be ugly? Or do you try to keep from seriously underexposing the houses and other detail in the shadows? And, in fact, if you are using slide film or shooting JPEGs with a digital camera, you don't even try for this scene – any exposure that will keep the direct sun and specular glare from washing out the entire frame will result in nothing but ink blackness in the rest of the scene:
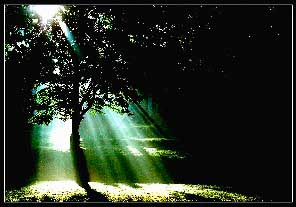
Fig 11. Same scene, wrong imager
Slide film or JPEG digital: the only solution would be to use a tripod and exposure bracket the scene by two stops under and over then combine the resulting frames digitally to merge the properly exposed bright areas from one frame and the properly exposed shadow areas from another. This is only do-able if there is no breeze or other subject motion.
Slide and digital photographers have two other tools in their belts to handle high contrast: neutral density graduated (ND grad) filters and fill-flash. (Neither would have helped to capture Fig 9.)
Given neg film or a digital camera with good dynamic range, we can rescue this scene with careful use of a spot meter. Here's the general recipe for using a spot meter on a problem scene:
Spot-metering recipe 1 (full version):
- Meter the brightest area you want to retain detail
- Meter the darkest area you want to retain detail
- If the difference between them does not exceed the dynamic range of your sensor, use the middle value between the two; otherwise choose whether you wish to sacrifice the highlights or the shadows.
Dynamic range¹
: simply means the total range of brightnesses in a scene that a sensor can handle between its black point of total under-exposure and its white point of total over-exposure. The dynamic range handling of neg film varies but is rarely less than 9 stops. The dynamic range handling of a digital camera depends upon the physical size of each pixel. As I write this, a typical APS-sized imager dSLR has about 8 or 9 stops, while with digital JPEG capture assume 6 stops, unless there is a menu option for low contrast. Slide film has 5 stops dynamic range (a few exceptions weigh in at 5½ stops). However, there is a caveat:Highlight latitude: both digital and slide film have a sharp cutoff point for highlight exposure. For example, a bright sky in a contrasty scene will be captured as a white sky even if it is blue or grey to your eyes, if you expose for the middle value of the entire scene. Using slide film you cannot exceed 2½ stops above middle grey without blowing the highlights. With a digital camera, experiment to find your highlight latitude, but 3 stops is probably a safe assumption for a dSLR.
Let's put the recipe to use on the scene in Fig 9. We already know we have no hope of saving the specular glare areas that go off scale. The rest of the readings range from a brightest of 1/1000th sec to a darkest of 1/8th sec, which is 7 stops. If we are using neg film or shooting raw in digital we can simply use the median value, about 1/90th sec, but we would do better to do some faster frames as well in hopes that one would give usable dark areas with minimal burn-out. If we are using slide film, as we see from Fig 11, there's not much hope short of digitally combining exposures. Still, our best bet for a single frame with slide film would be to drop down 2½ stops from our highest reading (1/1000) for something between 1/250 and 1/125, and let the shadows fall where they may. In practice this means:
Spot-metering recipe 2 (shortcut for slide/digital in high-contrast light):
- Meter the brightest area you want to retain detail
- Set exposure to that value minus the sensor's highlight latitude (-2½ stops for slide, often -3 stops for digital raw)
- Press shutter release.
For more detail about recipe 2, including how to determine your camera's highlight latitude for step 2, see Quick, Accurate High Contrast Exposures for Digital Cameras.
- - - - - -
¹ Purists distinguish between the dynamic range of the scene and the exposure latitude of the sensor. Exposure latitude is how much of the scene's dynamic range the imager can capture. Mostly you will hear the term dynamic range being used to cover both concepts.