The RX100/2 Meets SAM
And you go to boot camp
Table of contents. Page 1 of 4. Version 1.2, ©2013 by Dale Cotton, all rights reserved.
Own the expensive and professional-class Sony RX100 or RX100 Mark 2 but nervous about using the S, A, or M positions on the dial that real photographers use? Fear no more. You've come to the right place.
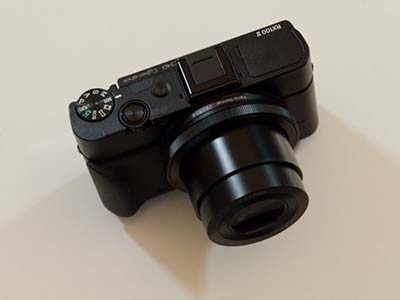
Fig 1: RX100M2
Perhaps it's just coincidence, but lately I keep seeing forum posts regarding exposure problems. The cameras in this case happen to be the RX100 and RX100 Mark II (hereafter (RX100/2 when referring to both), but you'll find the same issues cropping up for most any camera. One especially frequent complaint seems to be blown highlights and/or over-exposure. After years of working with other model cameras and beating my head against this brick wall, I've come to understand that the automation in modern cameras is not designed to prevent blown highlights or even over-exposure. It's designed to keep purchasers from complaining about the opposite problem:
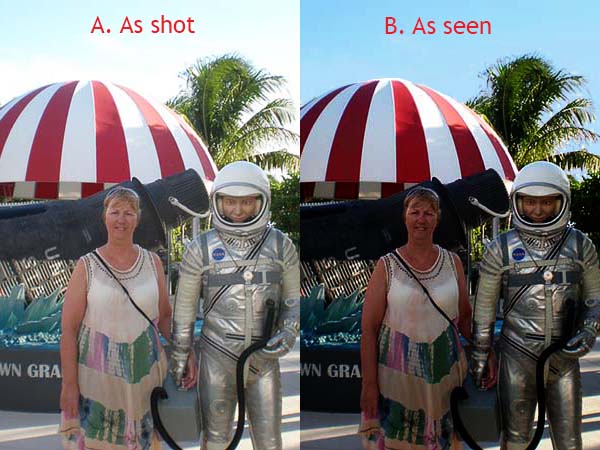
Fig. 2: Properly exposed for subject. Over-exposed for sky. (Courtesy wilsog33, Wikipedia Commons)
Fig. 2A is a crop from a snapshot, presumably with exposure set to automatic. Fig. 2B is how the scene likely looked and would need to have been taken to keep from blowing highlights. If the camera had exposed the shot we see in Fig. 2B in order to keep from blowing the sky, the woman and her space-suited companion – who happen to be standing in shadow – would have been as dark as we see in Fig. 2B. And that's what the camera company would have received a complaint about, not the blown sky.
Or, consider this classic scenario: Son and Daughter-in-law have just been pronounced man and wife. They come out of the church, stopping at the top of the steps for rice-throwing and photo-taking. It's a bright sunny day, but the sun is behind the building, putting the newlyweds in deep shadow. Dad doesn't have a master's in photography, he just wants his whiz-bang computerized camera to automatically get this shot right. And the camera probably will – by Dad's definition. It will meter to expose the newlyweds optimally, since that's what the camera is pointing at, and will not compromise that by trying to preserve colour in the sky.
If you let the camera make exposure decisions for you, fine. But understand that it's priorities have nothing to do with preserving highlights or capturing the scene the way it looks to the human eye.

Fig. 3: Properly exposed for tourists. Over-exposed for everything else. (Coutesy gpdprince, Wikipedia Commons)
In contrast, most people who purchase something as pricey as the RX100 are photography enthusiasts who have learned by example what technically competent photographs look like under a wide variety of shooting conditions. If you fall in this category, you need to realize that very little of the sexy automation this pocket marvel is chock-full of has been designed with you in mind.
The bad news is you really do have to learn how to use the dreaded S, A, and M positions on the mode dial. The good news is that it's not rocket science. In fact, it's actually pretty much a piece of cake. A bit tedious perhaps, but not an intellectual challenge. Not even close to doing your taxes.
A tad fuzzy about the basics?: First thing is to be really clear on the fundamentals of exposure: aperture, shutter speed, and ISO. These are simple but essential concepts. If you are at all hazy about any of these three, click here to jump to Appendix A to read the relevant parts of that before proceeding.
Welcome to Camp M
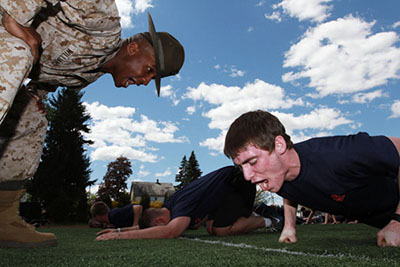
Fig. 4: Boot camp (courtesy media.dma.mil)
You may not realize it but you've just enlisted, and for the next ten days we're going to put you through the photography equivalent of boot camp. In the army, besides learning to grovel and to do more push-ups than you thought humanly possible, boot camp could mean learning to use and maintain a bolt-action rifle, until you know it inside-out and backwards. This happens before you're allowed to move on to anything more sophisticated.
In photo boot camp you get a free pass on the groveling and push-ups, but you're going to have to put your RX100/2 into manual mode and leave it there for a full week. Then you'll receive some training A and S modes. After boot camp you can go back to making use of the camera's automation. But from then on you'll do so with an understanding of what it's doing, so you can override it instead of blowing what should have been a great shot.
Fig. 5: RX100 mode dial set to MR
Be prepared: Before you get started, make sure you have at least one of the memory recall positions (MR on the mode dial) set to whatever just-get-the-shot settings you are most comfortable with. Even if it's one of the automatic modes, such as intelligent auto, save that as an MR option. By doing so you're saving the entire configuration of the camera – not just a position on the mode dial. It's a configuration you know will get you some sort of passable picture in a rush situation, whether it's little Johnny taking his first step, or that UFO that has just landed on your front lawn. A very good habit to get into is to always switch your camera to this emergency MR setting before turning it off, whenever you don't expect to be using it a few minutes later.
But for now, switch the mode dial to the dreaded M position. It's going to stay there for what will feel like a long, long time... ;)
M mode is not all-manual: Throughout this tutorial I'll be using the phrase manual mode, referring to the M position on the mode dial. In this context manual mode refers only to manual exposure, it doesn't imply manual focus need be involved at all.
Day 1: Getting Started in M Mode
Manual mode forces you to make the decision for all three exposure factors, instead of leaving any of them under the control of the camera's automation. This doesn't mean making complex mathematical calculations. In fact, even in manual mode we have some incredible assistance at our disposal, including autofocus and especially the real-time preview that happens automatically on the LCD of any digital camera except dSLRs.
To get started we need to be literally on the same page regarding camera settings. First switch your mode dial to M, then in each of the following menu sections make sure you have these options set as indicated:
Camera 2
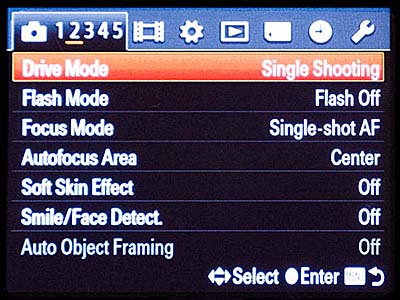
Fig. 6: Camera 2 menu
- Drive mode = single shooting
- Flash mode = off
- Focus mode = single-shot AF
- Autofocus area = center
Camera 3
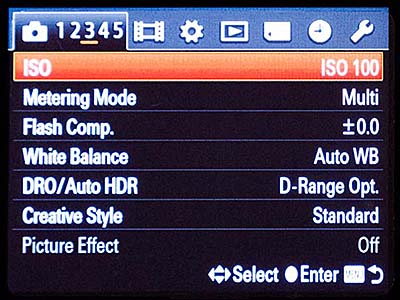
Fig. 7: Camera 3 menu
- Metering mode = Multi
- White balance = Auto WB
Gear 1
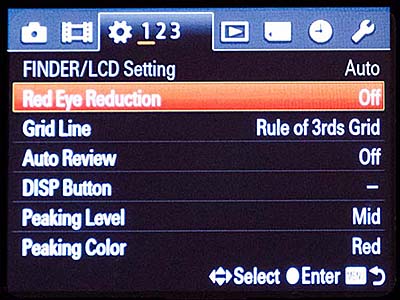
Fig. 8: Gear 1 menu
- Grid Line = personal taste, but I find them useful
- Auto review = I recommend off
- DISP button = make sure histogram is available
Gear 2
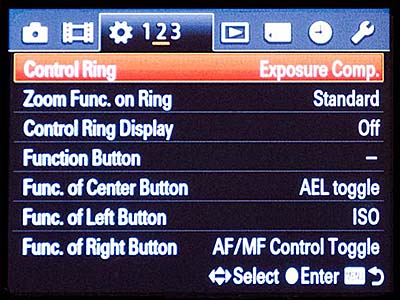
Fig. 9: Gear 2 menu
- Control ring = anything but ISO, aperture, or shutter speed
- Func. of Left or Right button = ISO
None of these settings is on the list because it's particularly necessary or desirable for manual mode work. All we're doing with these settings is creating a KISS environment for the duration of the learning period.
Why these choices? Single-shot autofocus from the center focus point may seem, less than optimal if you're into focus point selection. By all means use focus point selection if you are already proficient with it. For other readers I'm just trying to eliminate a point of complexity. What about the metering pattern – wouldn't spot be more precise than multi? There is a great trick to preventing blown highlights that involves using the spot metering pattern, but it depends upon the spot area being sufficiently small, and the RX100/2's spot area is anything but small. Instead, we'll be taking advantage of the real-time exposure information to side-step the distinctions between the three metering patterns. Why auto white balance? White balance presets are mostly obsolete. Typically, they are only accurate to the nearest 1000K, which is a joke. You may occasionally solve a mix lighting problem using a preset – and in that case by all means go for it – but in most situations auto WB is going to be more accurate than the nearest preset. Why auto review off – is this to prevent chimping? Not at all. By all means assign an autoreview time value if you aren't working with moving subjects. But when trying to capture something in motion, having the camera instantly ready to take the next shot can be invaluable. Why put the control ring (lens ring) to anything but an exposure function? First, because it simplifies step-by-step explanations not to have to take into account that shutter or aperture may be controllable from more than one place. Secondly, Many people have the lens ring set to zoom or other function, so why mess that up for them? I, myself, normally have ISO on the lens ring. But for the duration of this tutorial, I'm reverting to the set-up described.
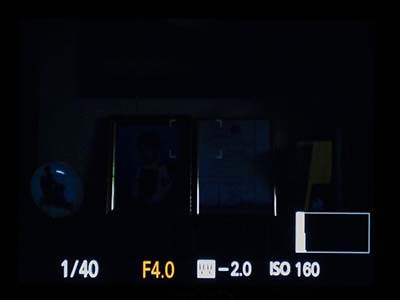
Fig. 10: LCD showing under exposure: F number changed to 4.0
Once you press the menu button to exit back to shooting mode, you may find the screen completely black, completely white, or 'way too dim or bright. Press the down rocker on the back control wheel once. Now, one of two things will be highlighted in red-orange: the left-most shutter speed number on the bottom of the display, or the F number beside it. If it's the F number, press the down rocker a second time to switch the highlight to the F number. Now scroll the control wheel until you see F5.0.
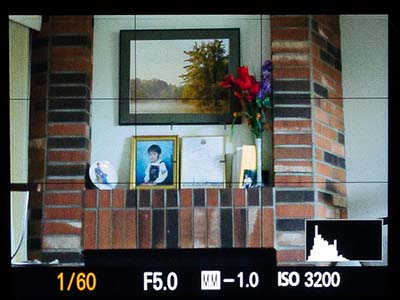
Fig. 11: LCD showing proper exposure: aperture, shutter speed, and ISO corrected.
Now press the down rocker again to return the highlight to shutter speed. Scroll the control wheel clockwise or counter-clockwise until the image you see on the LCD roughly matches what you see when looking at the scene itself instead of the LCD. If a) your shutter speed is at 1/2000th and the brightness of the scene on the LCD is still too great, or b) if your shutter speed is as low as 1/30th and the brightness is still too low, or c) if you're within that range and the brightness looks fine, lightly tap the shutter release to exit setting change mode. Both shutter speed and F number will again be white. But if either a) or b) are true you now need to modify the ISO setting. Press your chosen ISO button, then scroll the control wheel up or down until the brightness of the scene on the LCD looks reasonable, then tap the shutter release to accept that setting.
About the above shutter speeds: In the above instructions I used 1/2000th as the upper shutter speed limit because that's as high as the camera can go. I used 1/30th second as the lower shutter speed limit just to avoid making the instructions too complicated at that point. If you're shooting on a tripod you can go to as slow a setting as you have the patience for. We'll be working on shutter speeds later on, so 1/30th is very much a place holder for the real thing. Actually, so is F5.0, and we'll get to that, too.
Drill: All right, Soldier! Enough with the chin music. Give me ten. Take the camera into multiple different lighting environments and follow the above procedure to adjust shutter speed and, if necessary, ISO, but leave the F number at 4.0 to 4.9. Deliberately switch from bright to dark situations, such as from outdoor daylight (including just pointing the camera out a window) to the interior of a closet. Do whatever it takes to bag ten different shots, in a variety of different light levels. You may soon find it makes more sense to adjust ISO before shutter in some circumstances. That's fine too. All you're doing here is getting comfortable with making manual adjustments to exposure variables.