Scanning & Post-Processing Colour Neg Film
page 2, version 1.1, ©2003, 2004 by Dale Cotton, all rights reserved.
VueScan or SilverFast for Final Scans
As with most scanners, the FS4000's native software is inadequate; thankfully there are alternatives. SilverFast is highly touted for neg film because of its library of film brand settings. If you're scanning Kodak Supra 400, you choose Kodak Supra 400 from the menu. SilverFast then knows the colour of the orange mask instead of guessing. After a long delay SilverFast finally released a version for the FS4000, but initial reports were that it was significantly buggy. I haven't heard anything since.
I've stuck with VueScan in spite of never-ending interface problems, such as hogging system resources, because it gives me nearly complete control of my scanner. Incidentally, VueScan has a library of film brand settings, too.
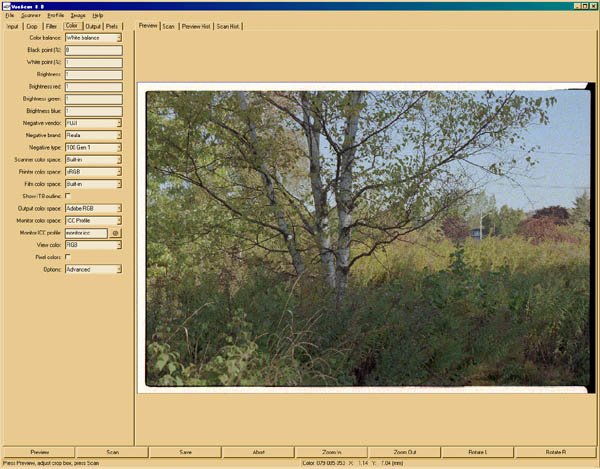
Fig 3. Previewing the selected frame in VueScan
- 4. Load film strip containing chosen frame in holder; start VueScan; click preview.
Notice that the blue sky has mysteriously re-appeared. Same film frame; same scanner; competent software.
VueScan has a daunting number of control options in advanced mode. The basic settings are to select Color Negative as the media type, White Balance as the Color Balance type, and pick the closest film brand to what you are using you can find among the out-of-date choices. Here are a few thoughts on some of the other options in VueScan:
Input/Number of passes: I find multple pass scanning actually increases noise. That may be an idiosyncracy of my scanner.
Input/Long exposure pass: A wonderful VueScan bonus. I use this whenever the neg has extremely bright areas, such as sunlit clouds or backlighting or specular glare.
Input/Bits per pixel: See my FAQ on scanning bit depth.
Input/Scan resolution: See my FAQ on scanning resolution.
Color/Color balance: Notice the options for tungsten, fluorescent, and night. For flash and daylight the White balance choice seems to work extremely well.
Color/Black point and White point: leave the black point at 0 and the White point at 1.
Color/Output color space: use sRGB unless you have profiled your system, in which case you'll know which one you want to use.
Back to the step-by-step:
- 5. Adjust crop.
- 6. Scan and save.
- 7. Use the separate R, B, and G channels in the Curves dialogue to remove any colour casts:
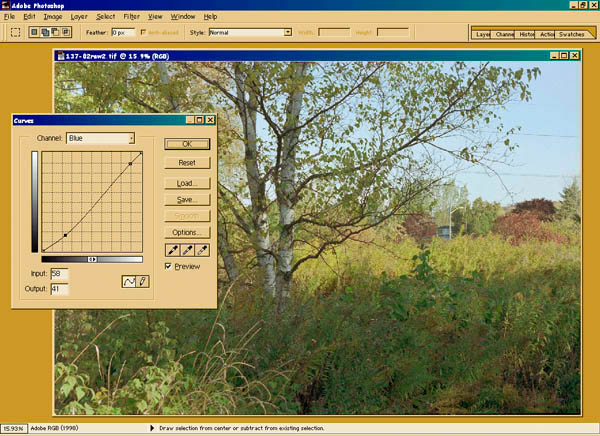
Fig 7. Removing a blue cast in the darker hues
Explaining colour cast removal is a full tutorial topic in itself. Fortunately, this has already been excellently done. See Color-Correcting Photographs in Photoshop by Bruce Fraser. For further help see also Appendix 3: Of Casts and Curves at the bottom of this page. As Bruce explains, one can often use the grey dropper in the Curves dialogue to at least get to square one. From there it's all up to your highly trained eye. In this image there is a small white house in the distance. Because the house is in shadow, the white shows as grey. I used the grey eyedropper on that and got quite close to my final colours.
Note: You may think that using slide film frees you from having to correct for colour casts. Not so. First, each film is designed to respond to a single colour temperature (usually 5000 degrees for daylight film); most daylight will be some other temperature than that. Second, each film has its own colour idiosyncracies, like those blankety-blank weak reds and yellows of Reala at its rated speed. The blue cast in the accurate scan above tells me that the light was at a higher temperature (bluer) than Reala's rated temperature.